Monday, December 19, 2011

วิธีการทำหมายเลขลำดับอัตโนมัติใน Crystal Report (Visual Basic 2008)

วิธีการทำหมายเลขลำดับอัตโนมัติใน Crystal Report (Visual Basic 2008)

posted Dec 23, 2009 8:34 PM by worawut bunwang   [ updated Dec 23, 2009 9:45 PM ]
 
การทำหมายเลขลำดับเราจะพบในรายงานต่างๆมากมายในชีวิตประจำวัน เรามาดูวิธีหมายเลขลำดับอัตโนมัติในการทำรายงานใน Crystal Report
ขั้นตอน
1. เปิดรายงานหรือสร้างรายงานที่ต้องการ
2. Field Explorer คลิกขวาที่  Running Total Fieids -> New
 
3. กำหนดค่า
   3.1 เลือก Field ที่จะกำหนด (หมายเลข 1)
   3.2 คลิกเพื่อเลือกค่าField ที่กำหนด (หมายเลข 2)
   3.3 กำหนดรูปแบบการรวม (หมายเลข 3)
   3.4 กำหนดรูปแบบการหาค่า (หมายเลข 4)
   3.5 กำหนดการเริ่มนับใหม่ (หมายเลข 5)
   3.6 คลิก OK
 
 
4. แดรก Field ที่ได้มาบริเวณที่ต้องการในรายงาน
 
5. ทดสอบโปรแกรมจะได้ผลตามต้องการ
 
นำไปใช้กับรายงานที่ต้องการครับ

คลิก Enter in textbox is postback another page !!!! ASP.NET AutoPostBack Property

ปัญหาเมื่อ กด enter ใน Textbox แล้วเกิดการ postback ไปยังหน้าื่ื่ือื่่น

วิธีการแก้ไข โดยการกำหนด AutoPostBack เป็น True


ASP.NET AutoPostBack Property

Definition and Usage

The AutoPostBack property is used to set or return whether or not an automatic post back occurs when the user presses "ENTER" or "TAB" in the TextBox control.
If this property is set to TRUE the automatic post back is enabled, otherwise FALSE. Default is FALSE.

Syntax

<asp:TextBox AutoPostBack="TRUE|FALSE" runat="server"/>


Example
The following example sets the AutoPostBack mode to "TRUE":

<form runat="server">
<asp:TextBox id="tb1" runat="server" AutoPostBack="TRUE" />
</form>

Thursday, December 15, 2011

Archive for category Crystal Reports

การออกรายงานบน Crystal report….
หลายคนประสบปัญหาข้อความหาย…
เมื่อข้อความยาวเกินความกว้างของตอลัมน์…
เช่น:
ข้อความ “Priority_Status”…
เมื่อแสดงบนรายงาน…ข้อความจะหายไปบางส่วน…
image
บนหน้าจอการออกแบบของ Crystal report…
เราสามารถปรับแต่งให้ตัดข้อความที่เกิน…ให้ขึ้นบรรทัดใหม่(Wrap text) ได้…เหมือนใน Excel…
โดยการคลิกขวาบนคอลัมน์ หรือฟิลด์ที่ต้องการ…
ในที่นี้ผมจะปรับสองคอลัมน์พร้อมกัน…
เมื่อคลิกขวา…แล้วเลือก Format Objects หากทำการปรับทีละคอลัมน์…
หรือเลือก Format Multiple Objects หากปรับทีละหลายคอลัมน์…
image

คลิกเลือก Can Grow…แล้วใส่จำนวนบรรทัดที่ต้องการลงไปในช่อง:…
Maximum number of lines: ในที่นี้ผมใส่ 2 บรรทัด…แล้วคลิก OK
image

ข้อความจะขึ้นบรรทัดใหม่ดังรูป…
แต่พบปัญหาใหม่คือ…ถ้าเราใส่เส้นเพื่อแบ่งข้อมูลแต่ละแถวด้วยแล้ว…
เส้นยังลอยอยู่ที่เดิม…ไม่ขยับไปด้วย…ทำให้ผู้ใช้งานสับสน…
image
เราสามารถสั่งให้เส้น…ย้ายตัวเองลงไปเบื้องล่างสุดของแถวได้ด้วยครับ…
โดยการคลิกขวา…บนอ็อบเจ็กต์ของเส้น…
แล้วเลือก Format Object… ดังรูปimage

แล้วคลิกเลือก Move to Button of Section wheb Printing…
แล้วคลิก OK…
image
คุณจะได้รายงาน พร้อมข้อมูล…ขึ้นบรรทัดใหม่ให้พร้อม…
เพียงเท่านี้ผู้ใช้งานของคุณ จะรู้สึกขอบคุณ คุณแล้วครับ…
image


ref : http://janawat.wordpress.com/2011/09/12/crystal-report-wrap-text/

Monday, December 12, 2011

ASP.NET & Visual Studio 2005,2008 - Publish Web Site

ASP.NET & Visual Studio 2005,2008 - Publish Web Site การนำโปรเจคไปใช้งานจริงบน Web Site หรือ Web Server หลังจากที่เราได้พัฒนาโปรแกรมจนเสร็จสิ้นแล้วและต้องการนำไปใช้งานจริง เราจะสังเกตุว่าใน Version 2005 และVersion 2008 ทุก ๆ ครั้งที่เราจะทำการ Run โปรแกรมจะไม่มีการ Build ให้อัตโนมัติเหมือนกับ 2003 เฉพาะฉะนั้น เราจะต้องทำการ Build ด้วยตัวเองครับ ประโยชน์ของการ Build ก็เปรียบเสมือนการบรรจุ Package โปรแกรมให้พร้อมใช้งานได้ในทันที ข้อดีก็คือ โปรแกรมจะทำการอ่าน Package ที่ได้จากการ Build แทนที่จะอ่านจากตัว Source Code ซึ่งต่อไปนี้ .vb หรือ .cs ก็จะไม่จำเป็นอีกต่อไป Source Code ต่าง ๆ ที่เราได้เขียนขึ้นมานั้นก็สามารถป้องกันการ Copy หรือการนำไปใช้ที่อื่น ๆ ได้อีก


เริ่มการ Build


Visual Studio 2005,2008

คลิกขวาที่ Project เลือก Publish Web Site


Visual Studio 2005,2008

ระบุโฟเดอร์ปลายทาง

Visual Studio 2005,2008

ได้ Package ที่พร้อมใช้หลังจากการ Build ซึ่งตอนนี้มีโฟเดอร์ bin อยู่แล้วครับ และไฟล์นามสกุล .vb หรือ .cs จะไม่จำเป็นต้องใช้อีกต่อไป 


Visual Studio 2005,2008

.dll ของโปรเจคที่ได้จากการ Build 


http://www.thaicreate.com/asp.net/asp.net-visual-studio-2005-publish-web-site.html

Running multiple versions of the Framework in ASP.NET

Like any good technology, ASP.NET continues to evolve as new versions are released.  But, like anything else, this brings with it a number of considerations. 

Microsoft has done a great job of allowing multiple versions of the framework to run side by side.  Version v1.0, v1.1 and v2.0 can all run together at the same time on the same server.  Each site, or even a vdir (Virtual Directory) within a site can have its own version of the framework installed.  Simply install the framework version on your server and it will be available to you.  The install itself is quite small, for example the v2.0 download is 22MB. 

The Microsoft homepage for the .NET Framework is: 
http://msdn.microsoft.com/netframework/downloads/updates/default.aspx 

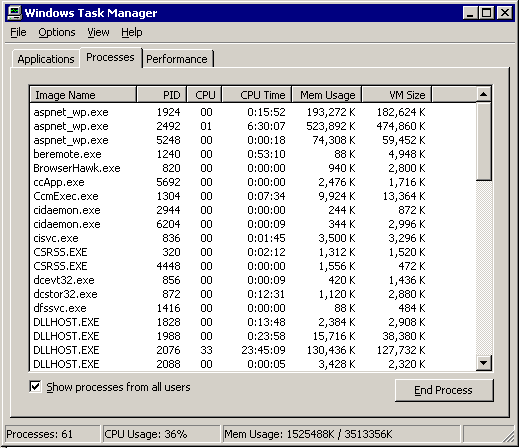
There are a couple gotchas to consider with running multiple versions of the framework side by side.  First, let's dig into IIS a bit.  Following is a snapshot of Windows Task Manager on an IIS5 (Windows 2000) server: 

aspnet_wp.exe_iis5  

Notice the 3 processes called aspnet_wp.exe.  There is one per version of the framework. (v1.0, v1.1 and v2.0)  If a process for a particular version of the framework doesn't exist, as soon as it's needed, a new process will be spun up.  This allows multiple versions of the framework to live beside each other in IIS5.  No effort, no pain . . . it just works. 

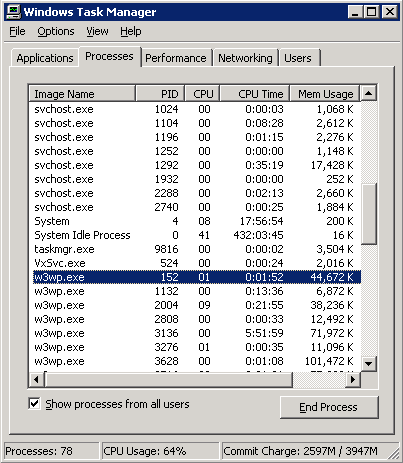
Now consider the following IIS6 (Windows Server 2003) screenshot: 
w3wp.exe_iis6  


Notice that there aren't any aspnet_wp.exe processes anymore, but there are w3wp.exe processes instead.  IIS6 was an impressive upgrade that brought with it some new concepts.  One key new concept is Application Pools.  A system administrator is able to create groups of sites and place each site in its own group.  Whenever a site needs to run, a w3wp.exe process will start for its application pool if it hasn't already started.  This brings with it a number of welcome security, performance and management advantages.  You are now able to specify your own Identity User which can be unique per Application Pool. 

In IIS6, the aspnet_wp.exe process is done away with, and the work that it did is now done within each w3wp.exe process.  This has the same advantages I mentioned previously, but it has one big gotcha!  

You cannot run more than one version of the framework in the same application pool in IIS6. 

While multiple versions of the framework can co-exist on the same server, they can't co-exist in the same process.  If you attempt to run multiple versions of the framework at the same time in the same process, the 2nd version that tries to run will fail with the following error: 

Server Application Unavailable

The web application you are attempting to access on this web server is currently unavailable.  Please hit the "Refresh" button in your web browser to retry your request.
Administrator Note: An error message detailing the cause of this specific request failure can be found in the application event log of the web server. Please review this log entry to discover what caused this error to occur. 
You will also receive Event ID 1062 in Event Viewer that says: 

"It is not possible to run two different versions of ASP.NET in the same IIS process. Please use the IIS Administration Tool to reconfigure your server to run the application in a separate process." 

What to do 

Fortunately, the solution is easy enough.  Simply create a new application pool and move the site that you will be upgrading to that pool.  You can even base it off of the existing one if you don't have the password memorized for the existing one.  This is all done within IIS.  Once you have placed the site or vdir in its own application pool, then you are ready to upgrade to the new framework version. 

I'll cover the different ways to move between different versions of the framework in another blog within the next few days, but the key thing to walk away with now is that multiple versions of the framework cannot co-exist in the same worker process at the same time.  IIS5 didn't have any issue with this, but IIS6 requires that each version be in its own app pool.


ref : http://weblogs.asp.net/owscott/archive/2006/01/26/Running-multiple-versions-of-the-Framework-in-ASP.NET.aspx

Creating an Application Starting Point in Internet Information Services

If you created a new web site to hold Affiliate Wiz, by default this new web site is its own application and there is no need to follow these instructions.  If you created a folder off an existing web site, follow these directions to make the folder an application starting point.
Creating an Application in IIS 7
In IIS 7, just...
  1. Open Internet Information Services.
  2. Find the web site, find the folder, right click the folder and select "Convert To Application".
  3. On the next screen, click OK.
Creating an Application in IIS 6
  1. Open Internet Information Services.
  2. Find the web site, find the folder, right click the folder and select properties.
  3. Click the Directory folder.
  4. Under Applications settings, click the Create button.  The application is now created.  Click OK to finish.
  5. Click the ASP.NET tab, make sure .net 2.0 is selected as the version of .net.

Installing ASP.NET 4 in IIS 6

With the new .NET 4 framework, comes some problems if you are still running still IIS 6 on Windows Server. IIS 6 does not let you have more than one framework at the time running in the same instance or website like IIS7 that can create a Application Pool targeting a different framework.
When IIS 6 runs under ASP.NET 2.0 (3.0 and 3.5 are superset, not frameworks) you are going to hit this error if the application is 4.0
Configuration Error
Description: An error occurred during the processing of a configuration file required to service this request. Please review the specific error details below and modify your configuration file appropriately.
Parser Error Message: Unrecognized attribute 'targetFramework'. Note that attribute names are case-sensitive.
Source Error:
Line 11:     </configSections>
Line 12:     <system.web>
Line 13:         <compilation debug="true" targetFramework="4.0">
Line 14:         </compilation>
Line 15:         <pages controlRenderingCompatibilityVersion="3.5" clientIDMode="AutoID"/></system.web>
You have a few options, downgrade the .NET application to 3.5 that Visual Studio 2010 makes it really easy. Just go to the WebSite properties -> Application tab and there is a drop down with all the framework releases, select 3.5, you VS2010 will reload the project and modify the web.config, if you added web service reference, that you may have to delete them and re-add them under 3.5
image
Now, you’ll have to unregister the ASP.NET 4.0 under IIS6, to do so, go to your console windows and go to the directory Windows/Microsoft.NET/Framework/v4.xxxx and type->aspnet_regiis /u
image
Then register ASP.NET 2.0 by going to Windows/Microsoft.net/Framework/v2.xxxxx> type aspnet_regiis /i
Hope that work for you.