Thursday, October 19, 2017

Encrypt and Decrypt Username or Password stored in database in ASP.Net using C# and VB.Net

In this article I will explain how to encrypt and store Username or Password in SQL Server Database Table and then fetch, decrypt and display it in ASP.Net.
The Username or Password will be first encrypted using AES Symmetric key (Same key) algorithm and then will be stored in the database. And while fetching it will be again decrypted using AES Algorithm using the same key that was used for encryption.
Database Schema
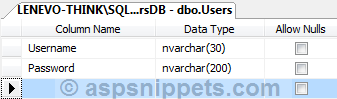
I have created a new database named UsersDB which consist of one table named Users with the following schema.
Encrypt and Decrypt Username or Password stored in database in ASP.Net using C# and VB.Net
You will notice that I have used NVARCHAR data type for storing Password, the reason is that when encrypted the password can contain special characters and hence it is recommended to use NVARCHAR instead of VARCHAR data type.
Note: The attached sample contains the SQL Script file to create the database and the table.
HTML Markup
The HTML Markup consists of Username and Password TextBoxes and a GridView to display the saved Usernames and Passwords.
<form id="form1" runat="server">
<table border="0" cellpadding="0" cellspacing="0">
    <tr>
        <td>
            Username:
        </td>
        <td>
            <asp:TextBox ID="txtUsername" runat="server" Text="" />
        </td>
    </tr>
    <tr>
        <td>
            Password:
        </td>
        <td>
            <asp:TextBox ID="txtPassword" runat="server" TextMode="Password" />
        </td>
    </tr>
    <tr>
        <td>
        </td>
        <td>
            <asp:Button ID="btnSubmit" OnClick="Submit" Text="Submit" runat="server" />
        </td>
    </tr>
</table>
<hr />
<asp:GridView ID="gvUsers" runat="server" AutoGenerateColumns="false" HeaderStyle-BackColor="#3AC0F2"
    HeaderStyle-ForeColor="White" RowStyle-BackColor="#A1DCF2" OnRowDataBound = "OnRowDataBound">
    <Columns>
        <asp:BoundField DataField="Username" HeaderText="Username" />
        <asp:BoundField DataField="Password" HeaderText="Encrypted Password" />
        <asp:BoundField DataField="Password" HeaderText="Desrypted Password" />
    </Columns>
</asp:GridView>
</form>
Namespaces
You will need to import the following namespaces.
C#
using System.IO;
using System.Text;
using System.Data;
using System.Data.SqlClient;
using System.Configuration;
using System.Security.Cryptography;
VB.Net
Imports System.IO
Imports System.Text
Imports System.Data
Imports System.Data.SqlClient
Imports System.Configuration
Imports System.Security.Cryptography
AES Algorithm Encryption and Decryption functions
Below are the functions for Encryption and Decryption which will be used for the Encrypting or Decrypting Username or Password.
Note: The following functions have been explained in the article AES Encryption Decryption (Cryptography) Tutorial with example in ASP.Net using C# and VB.Net

C#
private string Encrypt(string clearText)
{
    string EncryptionKey = "MAKV2SPBNI99212";
    byte[] clearBytes = Encoding.Unicode.GetBytes(clearText);
    using (Aes encryptor = Aes.Create())
    {
        Rfc2898DeriveBytes pdb = new Rfc2898DeriveBytes(EncryptionKey, new byte[] { 0x49, 0x76, 0x61, 0x6e, 0x20, 0x4d, 0x65, 0x64, 0x76, 0x65, 0x64, 0x65, 0x76 });
        encryptor.Key = pdb.GetBytes(32);
        encryptor.IV = pdb.GetBytes(16);
        using (MemoryStream ms = new MemoryStream())
        {
            using (CryptoStream cs = new CryptoStream(ms, encryptor.CreateEncryptor(), CryptoStreamMode.Write))
            {
                cs.Write(clearBytes, 0, clearBytes.Length);
                cs.Close();
            }
            clearText = Convert.ToBase64String(ms.ToArray());
        }
    }
    return clearText;
}
private string Decrypt(string cipherText)
{
    string EncryptionKey = "MAKV2SPBNI99212";
    byte[] cipherBytes = Convert.FromBase64String(cipherText);
    using (Aes encryptor = Aes.Create())
    {
        Rfc2898DeriveBytes pdb = new Rfc2898DeriveBytes(EncryptionKey, new byte[] { 0x49, 0x76, 0x61, 0x6e, 0x20, 0x4d, 0x65, 0x64, 0x76, 0x65, 0x64, 0x65, 0x76 });
        encryptor.Key = pdb.GetBytes(32);
        encryptor.IV = pdb.GetBytes(16);
        using (MemoryStream ms = new MemoryStream())
        {
            using (CryptoStream cs = new CryptoStream(ms, encryptor.CreateDecryptor(), CryptoStreamMode.Write))
            {
                cs.Write(cipherBytes, 0, cipherBytes.Length);
                cs.Close();
            }
            cipherText = Encoding.Unicode.GetString(ms.ToArray());
        }
    }
    return cipherText;
}
VB.Net
Private Function Encrypt(clearText As StringAs String
    Dim EncryptionKey As String = "MAKV2SPBNI99212"
    Dim clearBytes As Byte() = Encoding.Unicode.GetBytes(clearText)
    Using encryptor As Aes = Aes.Create()
        Dim pdb As New Rfc2898DeriveBytes(EncryptionKey, New Byte() {&H49, &H76, &H61, &H6E, &H20, &H4D, _
         &H65, &H64, &H76, &H65, &H64, &H65, _
         &H76})
        encryptor.Key = pdb.GetBytes(32)
        encryptor.IV = pdb.GetBytes(16)
        Using ms As New MemoryStream()
            Using cs As New CryptoStream(ms, encryptor.CreateEncryptor(), CryptoStreamMode.Write)
                cs.Write(clearBytes, 0, clearBytes.Length)
                cs.Close()
            End Using
            clearText = Convert.ToBase64String(ms.ToArray())
        End Using
    End Using
    Return clearText
End Function
Private Function Decrypt(cipherText As StringAs String
    Dim EncryptionKey As String = "MAKV2SPBNI99212"
    Dim cipherBytes As Byte() = Convert.FromBase64String(cipherText)
    Using encryptor As Aes = Aes.Create()
        Dim pdb As New Rfc2898DeriveBytes(EncryptionKey, New Byte() {&H49, &H76, &H61, &H6E, &H20, &H4D, _
         &H65, &H64, &H76, &H65, &H64, &H65, _
         &H76})
        encryptor.Key = pdb.GetBytes(32)
        encryptor.IV = pdb.GetBytes(16)
        Using ms As New MemoryStream()
            Using cs As New CryptoStream(ms, encryptor.CreateDecryptor(), CryptoStreamMode.Write)
                cs.Write(cipherBytes, 0, cipherBytes.Length)
                cs.Close()
            End Using
            cipherText = Encoding.Unicode.GetString(ms.ToArray())
        End Using
    End Using
    Return cipherText
End Function
Encrypting and storing the Password in Database Table
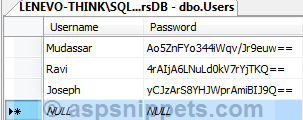
When the Button is clicked, the following event handler is raised which inserts the entered Username and Password into the database table. The Username is inserted directly but the Password is first encrypted using the Encryption function (discussed earlier) and then it is inserted.
C#
protected void Submit(object sender, EventArgs e)
{
    string constr = ConfigurationManager.ConnectionStrings["constr"].ConnectionString;
    using (SqlConnection con = new SqlConnection(constr))
    {
        using (SqlCommand cmd = new SqlCommand("INSERT INTO Users VALUES(@Username, @Password)"))
        {
            cmd.CommandType = CommandType.Text;
            cmd.Parameters.AddWithValue("@Username", txtUsername.Text.Trim());
            cmd.Parameters.AddWithValue("@Password", Encrypt(txtPassword.Text.Trim()));
            cmd.Connection = con;
            con.Open();
            cmd.ExecuteNonQuery();
            con.Close();
        }
    }
    Response.Redirect(Request.Url.AbsoluteUri);
}
VB.Net
Protected Sub Submit(sender As Object, e As EventArgs)
    Dim constr As String = ConfigurationManager.ConnectionStrings("constr").ConnectionString
    Using con As New SqlConnection(constr)
        Using cmd As New SqlCommand("INSERT INTO Users VALUES(@Username, @Password)")
            cmd.CommandType = CommandType.Text
            cmd.Parameters.AddWithValue("@Username", txtUsername.Text.Trim())
            cmd.Parameters.AddWithValue("@Password", Encrypt(txtPassword.Text.Trim()))
            cmd.Connection = con
            con.Open()
            cmd.ExecuteNonQuery()
            con.Close()
        End Using
    End Using
    Response.Redirect(Request.Url.AbsoluteUri)
End Sub
Encrypt and Decrypt Username or Password stored in database in ASP.Net using C# and VB.Net
Displaying the Usernames and Encrypted and Decrypted Passwords
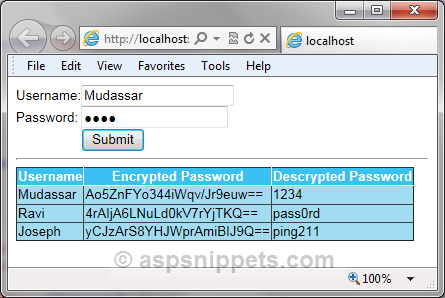
In the Page Load event of the Page, the GridView control is populated with the records from the Users table.
Now in the OnRowDataBound event of the GridView, Password is fetched from the GridView Cell and is Decrypted using the Decrypt function (discussed earlier).
C#
protected void Page_Load(object sender, EventArgs e)
{
    if (!this.IsPostBack)
    {
        string constr = ConfigurationManager.ConnectionStrings["constr"].ConnectionString;
        using (SqlConnection con = new SqlConnection(constr))
        {
            using (SqlCommand cmd = new SqlCommand("SELECT * FROM Users"))
            {
                using (SqlDataAdapter sda = new SqlDataAdapter())
                {
                    DataTable dt = new DataTable();
                    cmd.CommandType = CommandType.Text;
                    cmd.Connection = con;
                    sda.SelectCommand = cmd;
                    sda.Fill(dt);
                    gvUsers.DataSource = dt;
                    gvUsers.DataBind();
                }
            }
        }
    }
}
protected void OnRowDataBound(object sender, GridViewRowEventArgs e)
{
    if (e.Row.RowType == DataControlRowType.DataRow)
    {
        e.Row.Cells[2].Text = Decrypt(e.Row.Cells[2].Text);
    }
}
VB.Net
Protected Sub Page_Load(sender As Object, e As EventArgsHandles Me.Load
    If Not Me.IsPostBack Then
        Dim constr As String = ConfigurationManager.ConnectionStrings("constr").ConnectionString
        Using con As New SqlConnection(constr)
            Using cmd As New SqlCommand("SELECT * FROM Users")
                Using sda As New SqlDataAdapter()
                    Dim dt As New DataTable()
                    cmd.CommandType = CommandType.Text
                    cmd.Connection = con
                    sda.SelectCommand = cmd
                    sda.Fill(dt)
                    gvUsers.DataSource = dt
                    gvUsers.DataBind()
                End Using
            End Using
        End Using
    End If
End Sub
Protected Sub OnRowDataBound(sender As Object, e As GridViewRowEventArgs)
    If e.Row.RowType = DataControlRowType.DataRow Then
        e.Row.Cells(2).Text = Decrypt(e.Row.Cells(2).Text)
    End If
End Sub
Encrypt and Decrypt Username or Password stored in database in ASP.Net using C# and VB.Net
Downloads
source : https://www.aspsnippets.com/Articles/Encrypt-and-Decrypt-Username-or-Password-stored-in-database-in-ASPNet-using-C-and-VBNet.aspx

Wednesday, October 18, 2017

FileUpload Control File Type and File Size Validations

Normally we need validation to restrict the user for uploading any kind of files on a Web Server due to security or application requirement also we need to limit the file size to upload on web server.There are many ways to implement validation on file upload control its depend upon application requirement which method you can used .Here I will explain only three validation method you can implement on file upload controls.
 

Upload Control

Validation using Custom Validator on Client Side

You can used custom validator to implement fileupload validation on client side.This validation is faster and easy to implement. 
<%@ Page Language="C#" AutoEventWireup="true" CodeFile="Default2.aspx.cs" Inherits="Default2" %>

<!DOCTYPE html PUBLIC "-//W3C//DTD XHTML 1.0 Transitional//EN" "http://www.w3.org/TR/xhtml1/DTD/xhtml1-transitional.dtd">
<html xmlns="http://www.w3.org/1999/xhtml">
<head runat="server">
    <title>Untitled Page</title>
</head>
<body>
    <form id="form1" runat="server">

    <script language="javascript" type="text/javascript">
        function ValidateAttachment(Source, args)
        {
          var UploadControl = document.getElementById('<%= UploadControl.ClientID %>'); 
          
          var FilePath = UploadControl.value;
         
          if(FilePath =='') 
          {            
            args.IsValid = false;//No file found
          }
          else
          {
            var Extension = FilePath.substring(FilePath.lastIndexOf('.') + 1).toLowerCase();
         
            if (Extension == "doc" || Extension == "txt")
            {
              args.IsValid = true; // Valid file type
            }
            else
            {
              args.IsValid = false; // Not valid file type
            }
           }
        }


    </script>

    <div>
        <asp:FileUpload ID="UploadControl" runat="server" />
        &nbsp;<asp:Button ID="btnUpload" runat="server" Text="Upload" 
            onclick="btnUpload_Click" style="height: 26px" />
        <br />
        <asp:CustomValidator ID="CustomValidator1" runat="server" ClientValidationFunction="ValidateAttachment"
            ErrorMessage="Please select valid .doc or .txt file" 
            onservervalidate="CustomValidator1_ServerValidate"></asp:CustomValidator>
        <asp:Label runat="server" ID="StatusLabel" Text="Upload status: " />
       
    </div>
    </form>
</body>
</html>

Validation using Custom Validator on Server Side

You can also apply validation on server using custom validator its slower than client side but its more secure than client side. 

 protected void CustomValidator1_ServerValidate(object source, ServerValidateEventArgs args)
    {

        string UploadFileName = UploadControl.PostedFile.FileName;

        if (string.IsNullOrEmpty(UploadFileName))
        {
            args.IsValid = false;
        }
        else
        {
            string Extension = UploadFileName.Substring(UploadFileName.LastIndexOf('.') + 1).ToLower();

            if (Extension == "doc" || Extension == "txt")
            {
                if (UploadControl.PostedFile.ContentLength < 102400)
                {
                    args.IsValid = true;

                }
                else
                {
                    args.IsValid = false;
                    CustomValidator1.ErrorMessage = "File size should be less than 100 kb";
                }
            }
            else
            {
                args.IsValid = false; // Not valid file type
                CustomValidator1.ErrorMessage = "File Type should be .doc or .txt";
            }
        }


    }

By default, the maximum size of a file to be uploaded to the server using the FileUpload control is around 4MB. You cannot upload anything that is larger than this limit. 


Change File Upload Limit


In the web.config file, find a node called <httpRuntime> that looks like the following: 

<httpRuntime 
executionTimeout="110" 
maxRequestLength="4096" 
requestLengthDiskThreshold="80" 
useFullyQualifiedRedirectUrl="false" 
minFreeThreads="8" 
minLocalRequestFreeThreads="4" 
appRequestQueueLimit="5000" 
enableKernelOutputCache="true" 
enableVersionHeader="true" 
requireRootedSaveAsPath="true" 
enable="true" 
shutdownTimeout="90" 
delayNotificationTimeout="5" 
waitChangeNotification="0" 
maxWaitChangeNotification="0" 
enableHeaderChecking="true" 
sendCacheControlHeader="true" 
apartmentThreading="false" />


lot is going on in this single node, but the setting that takes care of the size of the files to be uploaded is the maxRequestLength attribute. By default, this is set to 4096 kilobytes (KB). Simply change this value to increase the size of the files that you can upload to the server. If you want to allow 10 megabyte (MB) files to be uploaded to the server, set the maxRequestLength value to 11264, meaning that the application allows files that are up to 11000 KB to be uploaded to the server.


for futher detail check this Working Around File Size Limitations.


Direct Validation on Upload Button 


In this method you don’t need to used custom validator you can directly write the code on button click and manually show message using label control.


 protected void btnUpload_Click(object sender, EventArgs e)
    {

        if (UploadControl.HasFile)
        {
            try
            {
                if (UploadControl.PostedFile.ContentType == "image/jpeg")
                {
                    if (UploadControl.PostedFile.ContentLength < 102400)
                    {
                        string filename = Path.GetFileName(UploadControl.FileName);
                        UploadControl.SaveAs(Server.MapPath("~/") + filename);
                        StatusLabel.Text = "Upload status: File uploaded!";
                    }
                    else
                        StatusLabel.Text = "Upload status: The file has to be less than 100 kb!";
                }
                else
                    StatusLabel.Text = "Upload status: Only .doc or .txt files are accepted!";
            }
            catch (Exception ex)
            {
                StatusLabel.Text = "Upload status: The file could not be uploaded. The following error occured: " + ex.Message;
            }
        }

    }

source : https://dotnetfarrukhabbas.blogspot.com/2011/08/fileupload-control-file-type-and-file.html

Create Dynamic Connection with Crystal Report using Asp.net and Oracle Stored Procedure

Dynamic crystal report connection string require
d for transfer application dev to test.Normally developer working in devlopment server and after complet the development it will deploy the application into TEST or Production Server .In this case crystal report have not worked if you are specially using oracle stored procedure .Here I explain you how to create function for dynamic connection with stored procedure.
using CrystalDecisions.CrystalReports.Engine;
using CrystalDecisions.Shared;
public static ReportDocument ConnectionInfo(ReportDocument rpt)
{
try
{
ReportDocument crSubreportDocument;
string[] strConnection = ConfigurationManager.ConnectionStrings(“ABC”)].ConnectionString.Split(new char[] { ‘;’ });
Database oCRDb = rpt.Database;
Tables oCRTables = oCRDb.Tables;
CrystalDecisions.CrystalReports.Engine.Table oCRTable = default(CrystalDecisions.CrystalReports.Engine.Table);
TableLogOnInfo oCRTableLogonInfo = default(CrystalDecisions.Shared.TableLogOnInfo);
ConnectionInfo oCRConnectionInfo = new CrystalDecisions.Shared.ConnectionInfo();
oCRConnectionInfo.ServerName = strConnection[0].Split(new char[] { ‘=’ }).GetValue(1).ToString();
oCRConnectionInfo.Password = strConnection[2].Split(new char[] { ‘=’ }).GetValue(1).ToString();
oCRConnectionInfo.UserID = strConnection[1].Split(new char[] { ‘=’ }).GetValue(1).ToString();
//Loop through all tables in the report and apply the
//connection information for each table.
for (int i = 0; i < oCRTables.Count; i++)
{
oCRTable = oCRTables[i];
oCRTableLogonInfo = oCRTable.LogOnInfo;
oCRTableLogonInfo.ConnectionInfo = oCRConnectionInfo;
oCRTable.ApplyLogOnInfo(oCRTableLogonInfo);
oCRTable.Location = “ABCUSER.” + oCRTable.Location;// this is a combination of Schema name and Stored procedure name
}
for (int i = 0; i < rpt.Subreports.Count; i++)
{
{
crSubreportDocument = rpt.OpenSubreport(rpt.Subreports[i].Name);
oCRDb = crSubreportDocument.Database;
oCRTables = oCRDb.Tables;
foreach (CrystalDecisions.CrystalReports.Engine.Table aTable in oCRTables)
{
oCRTableLogonInfo = aTable.LogOnInfo;
oCRTableLogonInfo.ConnectionInfo = oCRConnectionInfo;
aTable.ApplyLogOnInfo(oCRTableLogonInfo);
oCRTable.Location = “DMS_SYS_PROC.” + oCRTable.Location;
}
}
}
}
catch (Exception ex)
{
if (ExceptionPolicy.HandleException(ex, “General”))
throw;
}
return rpt;
}
This will not work with oracle packages.
Source : https://dotnetfarrukhabbas.wordpress.com/2010/10/12/create-dynamic-connection-with-crystal-report-using-asp-net-and-oracle-stored-procedure/

Dynamic Crystal Report Connection String Using Asp.net

Dynamic crystal report connection string required for transfer application dev to test.Normally developer working in devlopment server and after complet the development it will deploy the application into TEST or Production Server .In this case crystal report have not worked if you are specially using oracle stored procedure .Here I explain you how to create function for dynamic connection with stored procedure.

using CrystalDecisions.CrystalReports.Engine; 
using CrystalDecisions.Shared; 


public ReportDocument ConnectionInfo(ReportDocument rpt)
   {
       ReportDocument crSubreportDocument;
       string[] strConnection = ConfigurationManager.ConnectionStrings[("AppConn")].ConnectionString.Split(new char[] { ';' });

       Database oCRDb = rpt.Database;

       Tables oCRTables = oCRDb.Tables;

       CrystalDecisions.CrystalReports.Engine.Table oCRTable = default(CrystalDecisions.CrystalReports.Engine.Table);

       TableLogOnInfo oCRTableLogonInfo = default(CrystalDecisions.Shared.TableLogOnInfo);

       ConnectionInfo oCRConnectionInfo = new CrystalDecisions.Shared.ConnectionInfo();

       oCRConnectionInfo.ServerName = strConnection[0].Split(new char[] { '=' }).GetValue(1).ToString();
       oCRConnectionInfo.Password = strConnection[2].Split(new char[] { '=' }).GetValue(1).ToString();
       oCRConnectionInfo.UserID = strConnection[1].Split(new char[] { '=' }).GetValue(1).ToString();

       for (int i = 0; i < oCRTables.Count; i++)
       {
           oCRTable = oCRTables[i];
           oCRTableLogonInfo = oCRTable.LogOnInfo;
           oCRTableLogonInfo.ConnectionInfo = oCRConnectionInfo;
           oCRTable.ApplyLogOnInfo(oCRTableLogonInfo);
           if (oCRTable.TestConnectivity())
               //' If there is a "." in the location then remove the
               // ' beginning of the fully qualified location.
               //' Example "dbo.northwind.customers" would become
               //' "customers".
               oCRTable.Location = oCRTable.Location.Substring(oCRTable.Location.LastIndexOf(".") + 1);


       }

       for (int i = 0; i < rpt.Subreports.Count; i++)
       {

           {
               //  crSubreportObject = (SubreportObject);
               crSubreportDocument = rpt.OpenSubreport(rpt.Subreports[i].Name);
               oCRDb = crSubreportDocument.Database;
               oCRTables = oCRDb.Tables;
               foreach (CrystalDecisions.CrystalReports.Engine.Table aTable in oCRTables)
               {
                   oCRTableLogonInfo = aTable.LogOnInfo;
                   oCRTableLogonInfo.ConnectionInfo = oCRConnectionInfo;
                   aTable.ApplyLogOnInfo(oCRTableLogonInfo);
                   if (aTable.TestConnectivity())
                       //' If there is a "." in the location then remove the
                       // ' beginning of the fully qualified location.
                       //' Example "dbo.northwind.customers" would become
                       //' "customers".
                      aTable.Location = aTable.Location.Substring(aTable.Location.LastIndexOf(".") + 1);

               }
           }
       }
       //  }

       rpt.Refresh();
       return rpt;
   }


This will not work with oracle packages.

source : https://dotnetfarrukhabbas.blogspot.com/2010/10/create-dynamic-connection-with-crystal.html

Tuesday, October 17, 2017

Adding attributes to the <body> tag when using Master Pages

roblem

If you are using Master Pages in an ASP.NET application and you need to add an attribute to the <BODY> tag from a Content Page -- for instance, to set a client script function for the onload event of the page -- you will find that you can't do it directly because the <BODY> tag is in the Master Page, not in your Content Page.

Solution

Make the <BODY> tag on the Master Page a public property, so you can access it from any Content Page. First, promote the <BODY> tag in the Master Page to an ASP.NET server control. Change:
<BODY>
to:
<BODY id="MasterPageBodyTag" runat="server">
Now that the body tag is a server control, you can configure access to it as a public property in the Master Page code behind file:
using System.Web.UI.HtmlControls;
public partial class MyMasterPage : System.Web.UI.MasterPage
{
    public HtmlGenericControl BodyTag
    {
        get
        {
            return MasterPageBodyTag;
        }
        set
        {
            MasterPageBodyTag = value;
        }
    }
...
Note that the MasterPageBodyTag server control is of type System.Web.UI.HtmlControls.HtmlGenericControl. To demonstrate this, just set a breakpoint in the Page_Load function in the code behind file, run the ASP.NET project in debug mode to that point, and execute ?MasterPageBodyTag.GetType().ToString() in the Immediate Window. To use this property from a Content Page, first declare the type of your Master Page in your Content Page's ASPX file:
<%@ MasterType TypeName="MyMasterPage" %>
Then somewhere in your Content Page's code behind file, use the Master Page's BodyTag property to add an attribute to the <BODY> tag:
protected void Page_Load(object sender, EventArgs e)
{
    Master.BodyTag.Attributes.Add("onload", "SayHello()");
...
This example, of course, assumes that there is a SayHello() client script in this Content Page. Running the application to the Content Page and then viewing the source code in the browser will show that the onload="SayHello()" attribute was added to the <BODY> tag. This technique should work for any HTML tag in the Master Page that you wish to access from a Content Page.

Source : https://www.codeproject.com/Articles/19386/Adding-attributes-to-the-lt-body-tag-when-using-Ma

Wednesday, August 30, 2017

How-To: Schedule Full Automatic cPanel Backups for MySQL Databases and Files using the Cron

Update Oct. 2012!

This script has been thoroughly revised and updated and works with the latest version of cPanel and WHM. And it’s still free! Also, a new version of the WHM reseller backup script has been released.
The guide in this video is for version 1.0 of the script. It has since be updated significantly – you should edit config.php instead
Ensuring your website and data are safe in the event of a disaster can be a tricky and time consuming task.
Have you recently made a complete backup of your website?
“No” is not a option any more – it’s easy with the right tools.
For those of you who don’t have professional grade Managed WordPress Hosting that handles all this for you, we have built a script that will completely automate your daily/weekly backups.
We have built it for those out there that use cPanel (so we don’t support Plesk, sorry).

Schedule automatic web hosting backups for your MySQL and file Data

Of course, this automation script is completely free and we encourage you do to download it and set it up.
Further, to make it easy we have provided a clear step-by-step how-to video so you can implement it yourself in about 5 minutes without any hassle whatsoever.

Automatic backups in 4 easy-to-follow steps

  1. Download the script that we wrote.
  2. Edit the script with your web hosting details
  3. Upload the script to your web hosting using your FTP client
  4. Setup the automation (“cron” job)
You can download the cPanel backup script written in PHP here.

Easy to follow Video guide on how to setup the CPanel automatic backup

To make things super easy for you, I have put together a 4 minute video that outlines all you need to get the automation script installed on your web hosting site.
If you have any issues, please feel free to write a comment below, or on the Video on YouTube.

What Next?

If you’re having hassles with your web hosting and would prefer someone look after your website ensuring that you’re secure and your data is always backed up, please have a look at our Managed WordPress Hosting option.
Of course, if you’re just starting out, remember you can get a brand new, top-class website based on WordPress for only 100!

Use the form below to join our Developer Channel

Do you need an automated CPanel web hosting backup script? There is that and more in the Developer Channel

source : https://www.hostliketoast.com/2011/09/how-to-schedule-full-automatic-cpanel-backups-mysql-databases-files-cron/

Thursday, June 15, 2017

āļ•้āļ­āļ‡āļāļēāļĢāļĒ่āļ­ URL[āļĨิāļ‡āļ„์] āđƒāļŦ้āļŠั้āļ™āļĨāļ‡āđ„āļ”้āļ­āļĒ่āļēāļ‡āđ„āļĢ[āļŸāļĢี]

āļŦāļĨāļēāļĒāļ—่āļēāļ™āļ„āļ‡āđ€āļĢิ่āļĄāļĄี Fanpage āđ€āļ›็āļ™āļ‚āļ­āļ‡āļ•ัāļ§āđ€āļ­āļ‡āđāļĨ้āļ§ āļ‹ึ่āļ‡āļˆāļ°āļĄี URL āļŦāļĢืāļ­ link āļ—ี่āļĒāļēāļ§āļĄāļēāļāđ† āđāļ™่āļ™āļ­āļ™āļĒāļēāļāļ•่āļ­āļāļēāļĢāļˆāļ”āļˆāļģ āļŦāļĢืāļ­ āļšāļ­āļāļ•่āļ­ …āļŦāļēāļāļĄีāļŦāļ™āļ—āļēāļ‡.. āļ—ี่āļˆāļ°āļĒ่āļ­āđƒāļŦ้āļŠั้āļ™āļĨāļ‡āđ„āļ”้ āļ„āļ‡āļˆāļ°āļ”ีāđ„āļĄ่āļ™้āļ­āļĒ āļ‚āļ­āđ€āļĢีāļĒāļ™āđāļ™āļ°āļ™āļģāļ”ัāļ‡āļ™ี้āļ„āļĢัāļš ;

āļ•ัāļ§āļ­āļĒ่āļēāļ‡āđ€āļŠ่āļ™ FB Fanpage āļ‚āļ­āļ‡āļœāļĄ(āļ‹ึ่āļ‡ URL āļŦāļĢืāļ­ link āļĒāļēāļ§āļĄāļēāļ) āļ„ืāļ­ https://www.facebook.com/pages/Motiveblogcom/208795992533447?fref=ts
āļŦāļĨัāļ‡āļˆāļēāļāļĒ่āļ­ URL āđāļĨ้āļ§āļˆāļ°āđ€āļŦāļĨืāļ­āđ€āļžีāļĒāļ‡ = goo.gl/c3ddMM <<< āļĨāļ­āļ‡āļ„āļĨิāļāļ”ูāļ„āļĢัāļš !Untitled
āļ•่āļ­āđ„āļ›āđ€āļĄื่āļ­āļĄีāđƒāļ„āļĢāļ„āļĨิāļāļ—ี่āļĨิāļ‡āļ„์ goo.gl/c3ddMM āļ™ี้ āļœāļĨāļ„ืāļ­āļˆāļ°āļ™āļģāđ„āļ›āļŠู่āļŦāļ™้āļē Fan page āļ‹ึ่āļ‡āļˆāļ°āļ‡่āļēāļĒāļāļ§่āļēāļĄāļēāļ āļ–้āļēāļˆāļ°āļšāļ­āļāđƒāļ„āļĢāđ†āļŦāļĢืāļ­āđ‚āļ›āļĢāđ‚āļĄāļ—āļ­āļ­āļāđ„āļ› āđāļĨāļ”ูāđ„āļĄ่āđ€āļ—āļ­āļ°āļ—āļ° āđ„āļĄ่āļĢāļāļˆāļ™āļ™่āļēāđ€āļāļĨีāļĒāļ” āđāļĨāļ° āļ”ูāđ‚āļ›āļĢāļ‚ึ้āļ™āļĄāļēāļ­ีāļāđ€āļĨ็āļāļ™้āļ­āļĒ ;
:: āđāļĨ้āļ§āļˆāļ°āļĒ่āļ­ URL āļ—ีāļ§่āļēāļ™ี้āđ„āļ”้āļ­āļĒ่āļēāļ‡āđ„āļĢ ?
āļ‚āļ­āđāļ™āļ°āļ™āļģ“āļ‚āļ­āļ‡āļŸāļĢี”āđ€āļŠ่āļ™āđ€āļ„āļĒāļˆāļēāāļ­āļēāļู๋” google.com āļ„āļĢัāļš āđ€āļĢิ่āļĄāđ‚āļ”āļĒāđƒāļŦ้ āļžิāļĄāļžิ์ goo.gl āļĨāļ‡āđ„āļ›āđƒāļ™ URL āļ—ี่āļ„ุāļ“āđƒāļŠ้āļ„āļĢัāļš āļœāļĨāļ„ืāļ­ āļˆāļ°āđ€āļ‚้āļēāļŠู่āļŦāļ™้āļēāļ™ี้āļ„āļĢัāļš
āļĒ่āļ­ URL _01

āļˆāļēāļāļ™ั้āļ™āđƒāļŦ้ Copy URL āļ‚āļ­āļ‡ FB Fanpage āđƒāļ™āļ—ี่āļ™ี้āļ„ืāļ­ https://www.facebook.com/pages/Motiveblogcom/208795992533447?fref=ts āļĨāļ‡āđ„āļ›āđƒāļ™āļŠ่āļ­āļ‡āļŠี่āđ€āļŦāļĨี่āļĒāļĄ
āļˆāļēāļāļ™ั้āļ™āļ„āļĨิāļāļ›ุ่āļĄ “Shorten URL”āļĒ่āļ­ URL _02
āļœāļĨāļ—ี่āđ„āļ”้ āļ„ืāļ­ āļˆāļ°āļĄี”āļŦāļ™้āļē” āđ€āļžิ่āļĄāļĄāļēāļ—āļēāļ‡āļ”้āļēāļ™āļ‚āļ§āļēāļĒ่āļ­ URL _03
āđƒāļŦ้āļžิāļĄāļžิ์āļĢāļŦัāļŠ āļ—ี่āđāļŠāļ”āļ‡āļ­āļĒู่āļĨāļ‡āđ„āļ›āđƒāļ™āļŠ่āļ­āļ‡
āļˆāļēāļāļ™ั้āļ™āļ„āļĨิāļ āļ›ุ่āļĄ “Verify”
āļœāļĨāļ—ี่āđ„āļ”้āļ„ืāļ­ http://goo.gl/c3ddMM āđ€āļ›็āļ™ URL āļ—ี่āļĒ่āļ­āđāļĨ้āļ§āļ‚āļ­āļ‡āļ„ุāļ“
āļ”ัāļ‡āđāļŠāļ”āļ‡āđƒāļ™āļ āļēāļžāļ”้āļēāļ™āļĨ่āļēāļ‡āļĒ่āļ­ URL _04
āđƒāļŦ้āđ€āļĢāļēāļāļ”āļ›ุ่āļĄ Ctrl+C āļšāļ™āļ„ีāļĒ์āļšāļ­āļĢ์āļ”āđ€āļžื่āļ­āļ—āļģāļāļēāļĢ Copy āđāļĨ้āļ§ āļ§āļēāļ‡[Pate] āļĨāļ‡āđ„āļ§้āđƒāļ™ Text file āļŦāļĢืāļ­ āļ­āļ°āđ„āļĢāļ็āđāļĨ้āļ§āđāļ•่ āđ€āļ็āļšāđ„āļ§้āļ‹ัāļāļ—ี่āđƒāļ™ PC [Folder] āļ‚āļ­āļ‡āđ€āļĢāļē āđāļ™āļ°āļ™āļģāļ§่āļē Note āđ€āļ็āļšāđ„āļ§้āđƒāļ™āđ‚āļ—āļĢāļĻัāļžāļ—์āļĄืāļ­āļ–ืāļ­āļ”้āļ§āļĒ āļˆāļ°āļ”ีāļĄāļēāļ āļัāļ™āļĨืāļĄāđ„āļ”้āļ­ีāļāļ—āļēāļ‡
āļ—ีāļ™ี้āļĄāļēāļ—āļ”āļĨāļ­āļ‡āļœāļĨāļัāļ™ : āđ‚āļ”āļĒ
  • āļ—āļģāļāļēāļĢ Copy [Ctrl+C ]
  • āđāļĨ้āļ§āđ„āļ›āļ§āļēāļ‡[Ctrl+V ]āđƒāļ™ Web browser āļ—ี่āđ€āļĢāļēāđƒāļŠ้ āđ€āļžื่āļ­āļ”ูāļœāļĨāļĨัāļžāļ˜์āļ—ี่āļˆāļ°āđ„āļ”้
  • āļˆāļēāļāļ™ั้āļ™āļāļ”āļ›ุ่āļĄ “Enter” āļšāļ™āļ„ีāļĒ์āļšāļ­āļĢ์āļ”āļĒ่āļ­ URL _05
āļœāļĨāļ„ืāļ­ āļŠāļēāļĄāļēāļĢāļ–āđ€āļ‚้āļēāļŠู่āļŦāļ™้āļē FB Fanpage āļ‚āļ­āļ‡āđ€āļĢāļēāđ„āļ”้āļŠāļģāđ€āļĢ็āļˆ āļ”ัāļ‡āļĢูāļ›āļĒ่āļ­ URL _06
āļˆāļēāļ URL āļĒāļēāļ§āđ† āļĨāļ”āđ€āļŦāļĨืāļ­āđ€āļžีāļĒāļ‡ “goo.gl/c3ddMM” āļˆึāļ‡āļŠāļ°āļ”āļ§āļāļāļ§่āļē āļŦāļēāļāļˆāļ°āļ™āļģāđ„āļ›āļšāļ­āļāļ•่āļ­ āļŦāļĢืāļ­ āđ‚āļ›āļĢāđ‚āļĄāļ—
āļ•ัāļ§āļ­āļĒ่āļēāļ‡ āļāļēāļĢāļ”āļ›āļĢāđ‚āļĄāļ— āđ€āļŠ่āļ™
“āđāļŸāļ™āđ€āļžāļˆāļ‚āļ­āļ‡āļĢ้āļēāļ™ āļ„ืāļ­ goo.gl/c3ddMM
“āļāļ” like āļšāļ™āđāļŸāļ™āđ€āļžāļˆāļ‚āļ­āļ‡āļĢ้āļēāļ™āđ„āļ”้āļ—ี่āļ™ี่ >>> goo.gl/c3ddMM
“āļžāļšāļัāļšāđ€āļĢāļēāļšāļ™ FB Fanpage āđ„āļ”้āļ—ี่āļ™ี่ >>> goo.gl/c3ddMM āļ‚āļ­āļšāļ„ุāļ“āļŦāļēāļāļāļ” Like”

āļ‚āļ­āļ‚āļ­āļšāļ„ุāļ“ GOOGLE āļŠāļģāļŦāļĢัāļšāļŠิ่āļ‡āļ™ี้āļ„āļĢัāļš ………………āļŸāļĢี
short-url-google
āļ–้āļēāļ–āļēāļĄāļ§่āļē āļĄีāļœู้āđƒāļŦ้āļšāļĢิāļāļēāļĢāļĢāļēāļĒāļ­ื่āļ™āđ„āļŦāļĄ āļ—ี่āđƒāļŦ้āļšāļĢิāļāļēāļĢāļĒ่āļ­ URL āļŸāļĢีāđāļšāļšāļ™ี้āđ„āļ”้āļ­ีāļ āđ€āļ—่āļēāļ—ี่āļĢāļ§āļšāļĄāļēāđ„āļ”้ …āļĄีāļ”ัāļ‡āļ™ี้āļ„āļĢัāļš ;
https://bitly.com/
http://tinyurl.com/
http://ow.ly/url/shorten-url
http://is.gd/
http://su.pr/
http://cli.gs/cligs/new
http://budurl.com/
http://www.snipurl.com/

āļ‚āļ­āļšāļ„ุāļ“āļŠāļģāļŦāļĢัāļšāļāļēāļĢāļ•ิāļ”āļ•āļēāļĄāļ„āļĢัāļš
āļ§ัāļŠāļĢāļžāļ‡āļĐ์ āļ—āļ§ีāļŠุāļ‚
Blogger | Author
Blog : www.MotiveBLOG.com/index