Sunday, February 4, 2018

jQuery password reveal plug-in for input type password

The password reveal plug-in

Sometimes, you may need revealing the characters entered by the user in a password field. For example, your account creation form has a password field along with a confirm password field. You want your visitors seeing the characters entered in both fields for confirming that they are matching each other.
Although, there are other solutions (server or client side) where a script may check that both fields are the same but there may be other uses for revealing the passwords as well.
In this tutorial, I am going to show you such a jQuery plug-in that will reveal the password characters entered in the input type = “password”. See the demos and how you may use this in your web forms in the following section.

A demo of showing password

In the demo page, you can see two text fields are displayed. One is a normal input type password without using the plug-in. The other is assigned the plug-in class. As you click the small icon towards the right corner of the password field (an eye), it will display the password. The password will be visible as long as you press the icon. Have a look:
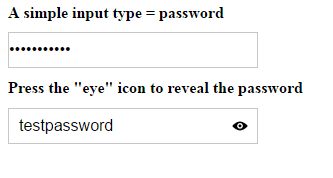
jQuery password reveal
See online demo and code
Follow these steps for setting up this plug-in.
Step 1:
Include the inputShowPwd and style CSS files in the <head> section of web page. You may get these files by downloading the package here.
Also, include the jQuery and plug-in JS files in the <head> section.
Step 2:
Create an input type password field. There, you may use a <span> tag for displaying “eye” icon:

The icon image is specified in the CSS file of the plug-in. If you want to change it or design your own, you may follow the path and replace the icon with your custom icon.
You can see an additional text field just above the password field.
Step 3:
Initiate the script in jQuery code section:

That’s it!

A demo of using in a form

In this example, I am using the reveal password field along with other fields like Name, Email, address etc. The purpose is to show you how you may set up for the real form. This is just a raw form with an additional CSS class.
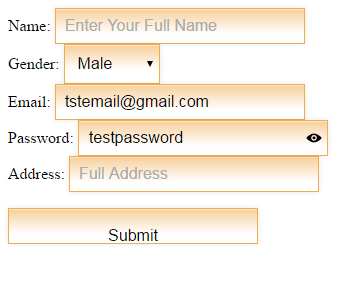
jQuery password reveal form
See online demo and code
Similarly, you may use this plug-in in any forms including Bootstrap based forms.

Source : https://www.jquery-az.com/jquery-password-reveal-plug-in-for-input-type-password/
Demo : https://www.jquery-az.com/jquery/demo.php?ex=56.0_1

Thursday, February 1, 2018

gentelella - how to hide sidebar (like it does in mobile mode)

My solution was edit custom.js and custom.css;
  • In custom.js edit the part $MENU_TOGGLE , only the part $BODY.toggleClass('nav-md nav-lg'); , change nav-sm to nav-lg;
  • In custom.css include code below:
    //move to left menu top and footer
    .nav-lg .top_nav {
    margin-left: 0px;
    }
    .nav-lg footer {
    margin-left: 0px;
    }
//hidden left menu
.nav-lg .left_col{
display: none;
}


/* how to hide sidebar (like it does in mobile mode) on 2018-02-01 by Eak*/
.nav-lg .top_nav {
    margin-left: 0px !important;
}

.nav-lg footer {
    margin-left: 0px !important;
}

.nav-lg .left_col {
    display: none !important;
}

.nav-lg .right_col {
    margin-left: 0px !important;
}

source : https://github.com/puikinsh/gentelella/issues/290

Monday, January 29, 2018

Automatically Redirect HTTP requests to HTTPS on IIS 7 using URL Rewrite 2.0

In a previous article I covered the installation URL Rewrite 2.0 for IIS 7. This is a plug-in for IIS 7 that allows you to manipulate URL’s.
URL Rewrite has a GUI to allow you to enter rules within IIS 7; in the background all this does is edit the web.config file of the site. I will show you how to create a rule both ways.
In the following example we will redirect HTTP to HTTPs using URL Rewrite. You will need the following items completed in order for this to work correctly.
– SSL Certificate for site installed in IIS.
– Site properly installed and configured for SSL (site set up and binding in IIS configured).
– URL Rewrite 2.0 is installed on the sever.

GUI Version

– Select the website you wish to configure
– In the “Features View” panel, double click URL Rewrite
You will notice there are currently no rules configured for this site. Click “Add Rules…” in the Actions menu to the right of the “Features View” panel
Use the default “Blank rule” and press “OK”.
When editing a rule there are the “Name” field and 4 configuration pull down boxes.
– Enter “Redirect to HTTPS” in the name field.
– Next we will configure the first configuration pull down box called “Match URL”, on the right side of “Match URL” press the down arrow to expand the box.
Within the “Match URL” configuration box we will set the following settings:
Requested URL: Matches the Pattern
Using: Regular Expressions
Pattern: (.*)
We can now edit the next configuration pull down box which is “Conditions”, Press “Add…” to add a new condition to the configuration.
We will configure the condition with the following settings:
Condition Input: {HTTPS}
Check if input string: Matches the Pattern
Pattern: ^OFF$
Press “OK”
You should see your condition in the list of conditions.
For this setting we do not need to configure the “Server Variables” pull down box. Continue onto the “Action” configuration box and pull down the box by selecting the arrow on the right. We will configure the following settings for the “Action” configuration:
Action Type: Redirect
Redirect URLhttps://{HTTP_HOST}/{R:1}
Redirect Type: See Other (303)
Press “Apply” then press “Back to Rules”
You should now see the rule configured on the main screen of the URL Rewrite module.
Test your site, it should now redirect from HTTP to HTTPS.
If we exam the web.config file we can see where the rule was entered. If we entered the rule directly into the web.config file it would show up in the GUI.
Web.Config Rule
You can also edit the web.config file of the site directly and you will be able to see the rule in the GUI. You will need to enter the following within the <system.webServer> </system.webServer> elements.
?
1
2
3
4
5
6
<rule name="Redirect to HTTPS" stopProcessing="true">
<match url="(.*)" />
<conditions><add input="{HTTPS}" pattern="^OFF$" />
</conditions>
<action type="Redirect" url="https://{HTTP_HOST}/{R:1}" redirectType="SeeOther" />
</rule>
When implementing this solution you need to make sure to use relative paths for all references on your page because there is a possibility you will get a warning asking you if you want to display secure and insecure items. For example, if you have a logo on your page and the URL to this logo is http://domain/images/logo.jpg, do not use the whole path because including the http:// will hard code this image to use http and not https. Instead use /images/logo.jpg.
Source : http://www.jppinto.com/2010/03/automatically-redirect-http-requests-to-https-on-iis7-using-url-rewrite-2-0/

Thursday, January 18, 2018

วิธีการย่อไฟล์รูป JPEG ให้มีขนาด kb ลดลง แต่ไซส์และความละเอียดเท่าเดิม!!

มีวิธีการย่อขนาดไฟล์รูป JPEG ให้เล็กลง แต่ขนาดและความละเอียดของภาพคงเดิม!! มาฝากกันครับ!!
ซึ่งคิดว่าหลายๆคนคงมีปัญหาการย่อไฟล์ภาพให้ให้ขนาดลดลงทีไร ไฟล์ภาพก็ออกมาดูแย่ลงทุกครั้งไป ... ซ้ำร้ายกว่านั้น บางคนเซฟรูปใน Quality 100% แต่ดันมีขนาดใหญ่ขึ้น และไฟล์แย่ลงนิดหน่อยด้วยซ้ำ!!

วันนี้ก็เลยมีวิธีการลดขนาดไฟล์ภาพที่เล็กลงทันตาเห็น เหมือนย่อรูปใหญ่ๆให้กลายเป็นรูปเล็กเลยล่ะครับ
แต่ที่ไหนได้!! ขนาดรูปเท่าเดิม!! รายละเอียดและความคมชัดเท่าเดิม!! ต่างตรงขนาดไฟล์ที่เล็กลงเกือบๆ 5 เท่า!! (สมมุติว่าไฟล์รูปเดิม ขนาด 2.5 MB คุณก็สามารถย่อให้เหลือ size ที่ 500 KB ได้เลยครับ!! โดยที่ขนาดเท่าเดิม และความคมชัดรายละเอียดก็เท่าๆเดิม มองไม่ต่างเลยครับ)

วิธีนี้ก็คือ การใช้โปรแกรมผ่านทางหน้าเวบที่ชื่อว่า JPEGmini ครับ ^ ^
โดยเพียงอัพโหลดภาพแล้วเอาท์พุทออกมา ก็จะได้ภาพที่ใหญ่ และละเอียดเท่าเดิม แต่ไฟล์เล็กลงจนไม่อยากจะเชื่อเลยครับ!! ^ ^
หน้าตาเวบก็เป็นแบบนี้ครับ

...
วิธีก็ง่ายๆครับ อัพโหลดรูปเข้าไป แล้วโปรแกรมมันจะแปลงไฟล์ให้ออโต้เลยครับ (เลือกที่ Try it now แล้วก็เลือก select photos ครับ)
...
ก็ขอโชว์ผลลัพธ์ที่ผมลองทำเล่นดูเลยแล้วกัน
ด้วยไฟล์รูปไฟล์นี้ครับ

ไฟล์รูปไฟล์นี้ หากครอป 100% จะได้ภาพละเอียดแบบนี้ครับ (ขนาด 5.9 MB)
พอย่อแล้ว ครอป 100% ได้ภาพละเอียดแบบนี้ครับ!! (ขนาด 1.3 MB!!)
...
เจ๋งไปเลยครับ!! เมื่อครอปภาพดูแล้ว ดูแทบไม่ออก แต่ปรากฏว่าขนาดไฟล์ต่างกันถึง 4.4 เท่า!! *0*
สนใจอยากลอง ไปลองได้เลยครับ ที่เวบ http://www.jpegmini.com ครับผม!! ^ ^
เวลาย่อรูปไปโพสต์ที่ไหนต่อไหนที่จำกัดจำนวน KB หากไม่อยากให้คุณภาพไฟล์เสียและอยากโพสต์รูปใหญ่ๆ ก็ใช้โปรแกรมนี้ช่วยได้จ้า ^ ^
(แต่ถ้าเอาไว้สำรองรูปภาพให้ไม่เปลืองเนื้อที่ความจำ ก็ทำได้ แต่จะเสียเวลาโหลดรูปแปลงในเวบนีนั่นเองครับ)


source : http://journey-trip-review.blogspot.com/2011/08/jpeg-kb.html

Wednesday, December 20, 2017