Last updated on January 17, 2021.
Trying my best to keep the story up-to-date. (react v17.0.1)
Git repo: SAURABH SHAH / ReactJS myapp · GitLab (wip)
This story will cover all the aspects of a react js web app architecture. If you are creating a new responsive web application using react JS, then follow along.
Our app architecture includes various features. A quick list of few aspects that we will cover is as per fig-1 above and fig-2 below.
Agenda of this story to create a robust and scalable web app from scratch using ReactJS:
✓ Create a new web application using react js framework.
✓ Cover all the dependencies used by a react js application
✓ Reasoning behind each dependency
✓ Dependency integration and configurations
✓ App integration steps for each dependency, if any.
This app architecture will possess all the below features with few bonus implementations on the go:
- App title + Favicon
- Router (navigation)
- Material UI
- Backend — Data connectivity (AXIOS for REST API, Firebase SDK integration)
- Redux + Thunk
- Multi-environment setup (create deployable builds pointing to specific Database environments using environment variables, without having all environment config bundled in code.)
- Internationalization
- Unit testing.
- Deployment and hosting (Firebase hosting)
- ES Lint
- Design Pattern (Container-View)
- CI/CD for continuous integration.
The story is divided into 3 sections:
Section-1 ENVIRONMENT SETUP
Section-2 FOLDER STRUCTURE
Section-3 ARCHITECTURE — DEVELOP / ADD FEATURES
This is a boilerplate application. The app architecture is developed considering the future scope and scalability of the app to include more and more features gradually.


Section-1 ENVIRONMENT SETUP
First things first, let’s set up the development environment for working on a react js based web application. Before starting the coding stuff, let me share the list of tools I personally prefer and used while this journey:


Use the following command to add new react project without installing react CLI globally:
$ npx create-react-app myapp
$ cd myapp
$ npm start
This will create a react js web app in a directory called “myapp” and run the project in the development environment on your default browser. It will also watch for the changes and perform hot-reloading for the best development experience.
React js application that is created via ‘create-react-app’ ships with some default code. Let’s remove almost everything (logo, images, content and styling) and keep the bare skeleton application.
Section-2 FOLDER STRUCTURE
In this section, we will cover only the directory structure of the react js application. During the walkthrough, we will cover a few app development improvements in detail. Please follow along.
With no further ado, let’s dive into the architecture:
“package.json” is the definition of react js projects. This is how it looks after creating a new app as of “updated date”: (react ver: 17.0.1)


First, we’ll restructure the application code to make it more robust and scalable. This will make it easy to on-boarding new resources by defining a common approach for the development process.
Please find below the structure of the app.
Do not worry about the files for now. Intention of this section is to share the thought process and purpose of each directory and structure as a whole.
/src/index.js :
- It is the default entry point of every react application. There are no changes in this file at all.
/src/… :
- All the resources generated by the team for our application must reside within this directory.
- This will be the core application source code.
- “/src/app.js” file is the container of our app and serves as an entry point.
Let’s dive in to understand the rationale behind this structure:
/assets :
- As the name suggests, all the static assets should reside here.
- Each asset should be registered and exported from the /index.js
- Thus, all assets will be accessible and imported from ‘/assets’
- This can include but not limited to images, logos, vector icons, fonts, etc.
/components:
- Only shared components used across features are placed here.
- All the components should be registered and exported from /index.js for a single access point.
- All the components should bear named export. This will avoid any conflicts.
- Components that consist of complex logic or redux integration can be further de-structured into “ComponentContainer.js” & “ComponentView.js” as per the “Container-View pattern” (this will be covered ahead in Design Patterns)
- TIP: Try to create named-exports instead of default exports for all the components. This will avoid any naming conflicts.
/config :
- All the app’s configurations are to be kept at this path.
- This can consist of date format, default language, some master data set or anything like so.
/i18n :
- Internationalization or multi-lingual support is achieved by the use of the “i18next” library.
- It mainly consists of a configuration file and all the language translations in independent language.json files.
- (More on react-i18next implementation in “ARCHITECTURE section” below)
/navigation :
- As the name suggests, all the routing logic resides here.
- Our app uses “react-router-dom” for routing implementation.
- Mainly 2 types of routes are included, public & private, where private being the ones that require authentication.
- “RouterConfig.js” will have all the routes of the application defined within at one place.
- “PrivatRoute.js” is a component to add a check for user authentication for secure/private routes.
Repo with PrivateRoute code sample. - CONSTANTS.js consists of all the constants for various available routes within our app. Reason is simply to avoid typos and easy renaming of routes when required.
- “/components” directory can be added to hold all the navigation specific components like header, nav-bar, side navbar, like so.
- (More on react-router-dom implementation in “ARCHITECTURE section” below)
/redux :
- It holds all the redux resources at one place.
- This includes action creators, reducers and a redux store of our app.
- CONSTANTS.js has all the action types.
- Initial state of the app is divided based on features and thus corresponding reducers and actions are modularized.
- “/actions” dir consists of all the action files. Each action file includes feature based action-creators. As the name suggests, appActions will have app config based actions and userActions will have all user state related actions.
- “/reducer” dir follows the same practice like actions. reducer reduces all the actions and applies corresponding changes to store. These reducers are later merged into a root-reducer redux’s combineReducers function.
- “/store.js” is the central state of the application. This incorporates all the mapping between reducer, store and middle-wares if any.
- We have a redux-thunk middleware in our app for enabling asynchronous dispatching of actions.
- Configuration for enabling dev tools for redux is done in store.js.
- Above files are enough for a “small to medium” sized applications.
For a large application with tens of features, each having tens of actions, types and individual initial states, it is recommended to have corresponding action.js, reducer.js, constants in the feature specific directory. Finally, it can be combined into a single store in the same way it is done now. - (More on redux, react-redux, redux-thunk implementation in “DEVELOP section” below)
/pages :
- This is the heart of our application.
- All the various features/screens/pages are defined here. In this case, “Home”, “Page1” and “Page2” are 3 different pages of our app.
- Each screen consists of an “index.js” file which exports the screen’s container as default module which makes the screen available as a functional component.
- Each page will have a “components” dir. This will hold all the components that are required by only this page.
- As a general rule, if a module (a utility, component, etc.) is only used within another module, then I want it nested in the directory structure as shown above.
- Home page consists of “Authentication”, “Dashboard” & “LanguageSelection” components that are nested within.
- “CardLayout.js” is a layout specific component and used only in Home.
Design Pattern:
Selecting a design pattern is an opinionated decision and should not impact the performance of the application. We are implementing the “Container — View pattern” in this application. One of the other famous design patterns is the “Atomic pattern”.
Container and View pattern:
(ref: https://reactpatterns.com/ & https://medium.com/@dan_abramov/smart-and-dumb-components-7ca2f9a7c7d0)
- Container-View pattern is the most efficient and widely used feature building pattern in react environment.
- Container Component: is the entry point of the Feature/Screen. Responsibilities of a container component are:
✓ data fetching
✓ redux integration
✓ side-effects handling, heavy computation or data mapping
✓ Finally pass the required props down to the View.
- View Component: should contain only the presentation part.
✓ All the UI/presentation logic will reside here.
✓ Further complex elements can be broken down into individual components for ease of maintenance.
✓ Presentational components utilize props, render, and context.
✓ Presentational components receive data and callbacks from props only, which can be provided by its container or parent component.
- PropTypes: It is a very good practice to declare propTypes for all the components that are expecting props from their parents. This enables type-checking, properties availability, and jots down all the required properties with their data-types at one place.
/services :
- Services are to manage all api requests. You can see them as a bridge or an adapter between the database server APIs and the view layer (pages and components) of our application.
- It will take care of all the network calls of our app.
- All data requests are defined here, and response data is transformed and served. In some cases it can also be saved in the redux store.
- The pages and components may dispatch actions, read the store and update themselves based on the data changes. They may access the services directly if it doesn’t need to be added to the redux store.
- Actions will use services for backend connectivity. Thunk is a redux middleware used to handle asynchronous actions and side-effects.
- In our app, all firebase config and constants reside in “firebase.js”. Authentication logic resides in “firebaseAuthentication.js” & all methods to query firestore data reside in “index.js”.
If the number/count of services increase, you can consider breaking them into individual feature based files.
/styles :
- This module holds our application-level styles.
- It can include theme definition (font, colours, typography) of the app UI, and global or commonly used styles.
- Material UI’s Theme is defined here and it can have global styles also exported as a part of the theme object as shown below.
- It can then be referenced in individual components using mui’s theme object.

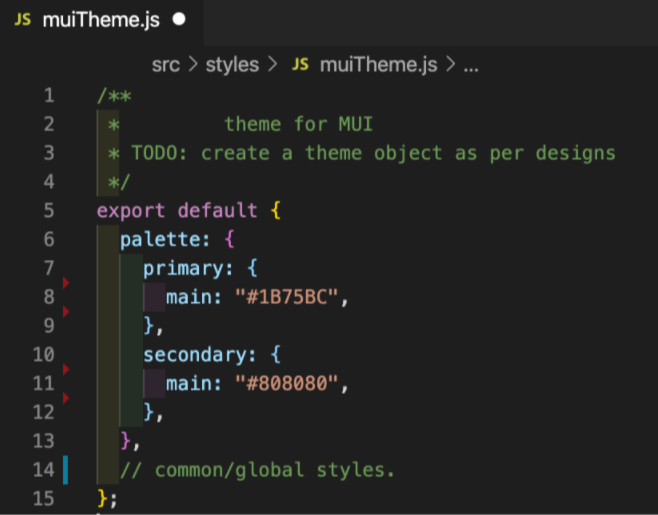
- pastebin link for above code: https://rentry.co/arowg/raw
- (More on MaterialUI implementation in “ARCHITECTURE section” below)
/utils :
- All the utility/helper methods, validations, etc. that can be shared across our entire project are added here.
- “dropConsole.js” is one of the utilities I have added. This is completely optional. Simple import this file as below in our app.js:
- Intention is to override all the console statements throughout the project without ejecting the react app. Also, hiding errors and other console methods is as per preference or client requirement. The “process.env.***” will be covered in “Environment variables” section below.
- pastebin link for above code: https://rentry.co/y3qav/raw
- Here we are dropping the console’s ‘logs’ & ‘warnings’ only. You can add scripts to drop tables and other methods as well.
- Note we have logged out a line “CAUTION:….” This is to warn end users to not use console so as to mitigate potential attacks.
/__tests__ :
- Jest framework is default supported by react for unit testing the application.
- All the unit test files can be placed inside “__tests__” dir alongside the corresponding .js files as recommended by react official documentation (https://create-react-app.dev/docs/running-tests).
- It can be components, miscellaneous functions, containers, or like so.
- (More on unit testing implementation in “DEVELOP section” below)
/jsconfig.json (not inside /src) :
- Make sure you create this file at root of your project and not inside /src.
- There are various uses of this file. I have used it only to define the base directory for all imports.
- This way when we require a shared component inside a view of a page, we don’t have to type a relative path like ‘../../components/sharedComp.js’
- We can simply use ‘components/sharedComp.js’ from anywhere in the project.
- Isn’t it wonderful 😀
- Most important, after you save the “/jsconfig.json” file, you have to kill react app in terminal and restart it using command “$ npm start”. (I’ve spent hours searching why its not working and realized about restart.)
- More details on Jsconfig — vscode.

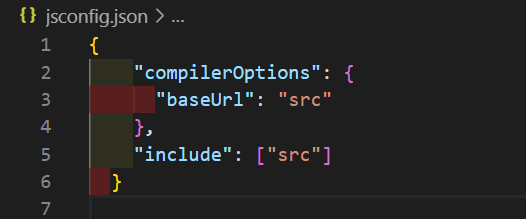
- pastebin link for above code: https://rentry.co/b8po2/raw
/.vscode/settings.json :
- This is to define common settings related to your vscode editor if you are using it.
- This way, you can have common tab-spacing, quotation marks and various other rules defined here for every project.
- A major advantage of this is everyone in the team will have the same settings. Thus, avoiding conflicts.
Section-3 ARCHITECTURE — DEVELOP / ADD FEATURES
(with EXTERNAL LIBRARIES)
We’ll start adding features/capabilities to our application one-by-one now. List of all the dependencies for our ReactNative project and its integration for a better architecture.
My strategy further on this story, is to take you through a step-by-step journey for creating a functional react js application. I’ve tried to capture references to all the corresponding official documentations.
Development thumb rules before we begin:
- As a general rule, if a module (a utility, component, etc.) is only used within another module, then I want it nested in the directory structure as shown above.
- We are not ejecting our react app. It is an irreversible process. There are workarounds for the limitations like minify/uglify, drop consoles and few other production ready accomplishments.
- All the code will reside strictly within the “/src” directory (Exceptions can be any static assets in /public if required.)
- Our app should be production ready and we don’t want all the environments’ configurations bundled together in each build. (Imagine each build has configs of your dev, stage, uat & prod environments all together). Thus, we will use the universally accepted approach of environment variables for the same.
- Unit testing is important, although we are not focusing on the same in this story.
- CI pipeline can be a bonus (Info on GitLab CI implementation in this story)
Let’s begin development:
NOTE: Anytime during development if something doesn’t work after npm install, try killing and restarting the react app.
Prep step-1: create-react-app
(ref: https://reactjs.org/tutorial/tutorial.html#setup-option-2-local-development-environment)
As explained in Section-1 Environment Setup, the 3 step process will create a fresh out-of-the-box react js application for your and run it on your default browser.
$ npx create-react-app myapp
$ cd myapp
$ npm start
After this, open your project in the code editor (if you are having vscode, use command “$ code .” from project root to open).
Prep step-2: Clean-up boilerplate
Remove all the unwanted stuff from the default “Welcome to react” application.
As of this document, I am using “react v17.0.1”
/app.css — remove all default styles and use this later for app styling.
/app.js — remove all content from return / render method.
/index.css — delete
/index.js — remove entry of index.css
Step-1: App title and favicon
These being static assets, the changes are required in the “/public” directory.
App title is the title shown in the browser window/tab.
For changing this:
✓ replace the static text in the “/public/index.html” & change the <title> tag value as required.
Favicon is the logo or icon of our app displayed in the browser window/tab.
✓ Replace the “/public/favicon.ico“ with your apps favicon image.
✓ This can be a .png file (not necessary to have .ico). You can add a new image file in “/public” directory.
✓ Update the path (filename) in “/public/index.html” in <link> tag as below:
<link rel=”icon” href=”%PUBLIC_URL%/<Your new icon>.png” />
Also, do necessary changes in “/public/manifest.json” file if you are planning to create this app as a PWA (more detail of Progressive Web App at official react page: https://create-react-app.dev/docs/making-a-progressive-web-app/ )
Step-2: Router (navigation) via react-router-dom
(ref: https://reactrouter.com/web/guides/quick-start)
react-router will avail routing and navigation capability to our React js app. It provides us with various features like widely used browser-router, hash-router, link, redirect, switch and many more.
React-router-dom library also provides features like maintaining history of user journeys.
Use the following command to add a react-router-dom library. We’ll use browser-router for this app.
$ npm install react-router-dom
Once installed, as discussed above, we have a dedicated directory “/src/navigation” with all the routing needs. Our RouterConfig.js may look something like below:
Where, all the paths are defined in CONSTANTS and the same are used in Link tags for navigation purposes. Refrain from hardcoding the paths all over your application.
Render this RouterConfig in your App.js between BrowserRouter as shown below:
Step-3: Material UI & Roboto font
(ref: https://material-ui.com/)
Material UI is a set of react js components that follow Material design pattern. It also enables the capability to use vector icons and various pre-build customizable components that come bundled with the Material UI module.
Above all, it provides a capability to define the style guide for overall application via its Theme provider module.
$ npm install @material-ui/core
$ npm install @material-ui/icons
$ npm install fontsource-roboto
(Very important: “install Roboto font, don’t just add a CDN link to avoid flickering issue.”)
Add reference to font in “/src/App.js”
import “fontsource-roboto”;
You can start using Material UI components in your app. Although I strongly recommend you to learn more about Material UI Customization and implement the ThemeProvider with base theme and wrap your app within ThemeProvider in “/src/App.js”.
Also, learn about customization and adding more styles using hooks or HOC. quick ref: https://material-ui.com/styles/basics/
Full React App with Router and MUI custom theme as a boilerplate available at GitLab:
Files · Step1–5-Router+MUI · SAURABH SHAH / ReactJS myapp · GitLab
Step-4: Backend Connectivity
We’ll cover 2 types of connectivity here. One is language/technology agnostic and very widely used and universally accepted data connectivity via “REST APIs”. Another is a technology specific, eg. “FIREBASE” connectivity using its Web-SDK.
AXIOS for REST API:
Axios is a simple data fetching module for REST API connectivity using all the required methods like GET, POST, PUT, DELETE, etc. Install axios in project using below command and we are ready to go.
$ npm install axios
Git repo with all coding so far.
Files · Step-6-axios · SAURABH SHAH / ReactJS myapp · GitLab
This example app has toggle option between “Remote API ”and corresponding “Local data” (toggle between via “/src/services/CONSTANTS.js” — good for dev)
A good reference for Axios with react js:
https://www.digitalocean.com/community/tutorials/react-axios-react
For further leveraging more hooks and ease of development, refer this library.
https://www.npmjs.com/package/use-axios-react
FIREBASE (Web-SDK)
Ref: https://firebase.google.com/docs/web/setup
This step is completely optional. If you do not want to have any backend REST APIs, services, endpoints, etc.. Firebase is one of the very good options. Firestore is a document database you can leverage for your DB requirements and firebase web-sdk provides you capability to connect, query and perform CRUD operations without the need of any middle-ware services like endpoints or API servers.
Setup for firebase web-sdk is very simple. The reference link is official documentation for the same. It is an easy to follow guide.
In this app we are using Firebase’s Firestore document database.
$ npm install firebase
In our app, we have a “/src/services” directory dedicated for backend calls and data connectivity. Thus, all our firebase configurations reside there. Biggest advantage of this architectural design step is decoupling of data connectivity from the business logic and presentation layer of the app. Thus, if we want to change the connectivity or scale the database to some other source, it is only here that we need to make changes. Below is the snapshot of our “/src/services/firebase.js”
Okay, I agree, this “process.env.REACT_APP_****” is something alien. Let me cover this in the upcoming part “Multi-environment setup”.
Although, it is exactly the same firebaseConfig that you get from your firebase project. Only difference is, we are storing and fetching the values from environment variables.
BONUS: Firebase Auth
If you are using the firebase authentication module, you can also leverage the firebaseUI module, which provides authentication UI and logic out-of-the-box for us. (https://firebase.google.com/docs/auth/web/firebaseui)
Step-5: Redux & Thunk
(ref: https://redux.js.org/ & https://react-redux.js.org/)
Redux is used for the provision of a central or app level state. All the data that needs to be shared across features, modules or react-component trees, can be added to the redux store.
Thunk is the middleware that works hand-in-hand with redux for handling the side-effects like fetching data from database, REST APIs, application processing delays, etc. It is promise based.
$ npm install redux react-redux
$ npm install redux-thunk
Once installed, we have to create all the required reducers and corresponding actions and action-creators. All the reducers will then be combined in single app level state and as defined in redux store.
BONUS: Redux Dev tools configuration:
We need to configure the redux dev tools while defining our store in “/src/redux/store.js” like:


- pastebin link for code: https://rentry.co/npggg/raw
Here process.env.NODE_ENV is by default available with create-react-app. Simply copy the same code.
Finally, our App.js has a return method somewhat like below: (includes MUI, Redux & Router)
Step-6: Multi-Environment setup (environment variables)
Ref: https://www.npmjs.com/package/env-cmd
We all have this requirement to create builds pointing to a specific data environment. Problem here is how to configure a specific environment when required. Changing the code every time is not the right way. Using environment variables is the perfect and universally accepted solution for this. Env-cmd is a module that adds this capability to any react js application.
$ npm install env-cmd
Once installed, simply define all the dynamic configuration parameters in the corresponding .env files. For example, for 3 envs like “development”, “staging” & “production”, we can have corresponding .env files “.env.development”, “.env.staging” & “.env.production”.
Remember, the basic rule is every environment variable we define in these files has to start with the “REACT_APP” prefix.
Also, we need to make changes to our build script to adapt the required data environment while running the application. Same applies for the scripts to create environment specific deployable packages. Refer official npm module reference for all the details. So the “npm start” command in package json needs to be changed from “react-scripts start” to “env-cmd -e development react-scripts start”.
An intuitive implementation example: https://medium.com/better-programming/managing-environments-for-provisional-builds-with-react-app-1fb411e3597
This is a totally optional step and based on personal choice or preference. Env-cmd module gives us different ways to define environments. Most common is an individual file for each environment. I personally prefer to have all configurations in one file like a .rc or .json file.
So our single “/.env-cmdrc.json” file resides at the root of our application and looks like:
We added a dropConsole.js utility in the beginning. We can leverage .env for deciding that as well.
Step-7: Internationalization (I18n)
(ref: https://react.i18next.com/getting-started & https://www.i18next.com/overview/getting-started)
react-i18next is a library to enable multilingual support to our reactjs app. It comes handy with various features like change app rendering language, fallback language for missing translations, translation configurations, capability to add default language detection middlewares, etc.
We’ll also use a browser-languagedetector to detect the default language of the end user.
Use following command to add internationalisation and corresponding modules in the app:
$ npm install react-i18next i18next
$ npm install i18next-browser-languagedetector
Please refer to official documentation for applying translations, changing user language, etc.
We have a dedicated directory in our architecture for internationalization. A snapshot of how our “/src/i18n/index.js” may look is as below:
Further you can export getter setter for selected language and use it from app.
Step-8: Unit testing framework
(ref: https://jestjs.io/docs/en/tutorial-react)
Jest is default supported in react js applications for unit testing. This will enable us to perform unit testing and generating code coverage reports.
Jest gives below features out of the box:
- Minimal configuration
- Watches only changed files
- Fast
- Snapshot testing
- Coverage out of box
In this app, we’re not emphasizing on testing framework. Although, for bigger apps, it is highly recommended to implement unit testing. It will save a lot of efforts while scaling the app in future.
Step-9: Deployment / Hosting
Hosting or deploying the webapp can be troublesome if the build or package is not created properly. A react application ships with a build script for outputting a production ready build in a “/build” directory. This build directory is the final independent package that can be deployed or hosted in any web hosting platform.
We can define various build and deploy scripts in our “/package.json” > ‘scripts’ object like below:

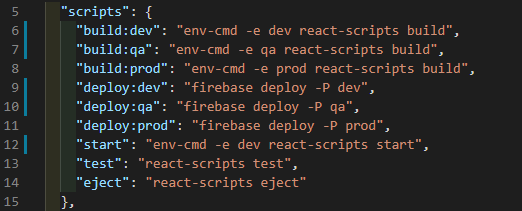
Here, “development”, “staging” & “production” are the 3 environments mapped with corresponding databases. Build and Deploy script is defined for each environment. All the react specific scripts start with “env-cmd -e environment” for leveraging environment variables via “emd-cmd” node module.
BONUS: Firebase Hosting
(ref: https://create-react-app.dev/docs/deployment/#firebase)
One of the simplest hosting platforms is the firebase hosting by google. It is literally like hosting your web project build/bundle in 5 minutes. I bet it won’t take more than that.
Official documentation mentioned in reference is the best resource for hosting a reactjs app on a firebase project. Although, let me list down simple steps if you are already aware and want to just go with the flow.
Let us assume we have a firebase projects for hosting, viz; “project-env-development”.
Run below commands at the root of our project.
$ npm install -g firebase-tools
//Install firebase cli globally
$ firebase login
// This will open google login on browser to authenticate you.
$ firebase init
// and follow as per below screen shot.


During this step, make sure you:
Select the appropriate firebase project you wish to host this application on;
Change the public directory to “build” as per our react js app;
Select Yes for single-page app;
Select No for Overwrite index.html.
$ firebase deploy // This will send the build to firebase for deployment / hosting.
Voila! deployed and available at “https://<your firebase project>.web.app/” over the internet.
Multi-project Firebase hosting setup:
(ref: https://firebase.googleblog.com/2016/07/deploy-to-multiple-environments-with.html)
You can also add multi-project setup for multi-environments like “project-env-development”, “project-env-staging” and “project-env-production” and use the deploy scripts in package.json accordingly.
$ firebase use — add // This will add a new firebase project in scope.
Added “project-env-staging” project with alias “staging”.
Switching environments:
$ firebase use // list all added environments with their alias.
$ firebase use default // change pointer to project-env-development firebase project.
$ firebase use staging // change pointer to project-env-staging firebase project.
Use below commands for deployment:
$ firebase deploy -P default
$ firebase deploy -P staging
(where, $ firebase deploy -P <environment default/staging>)
You can also manage/modify these alias in file “/.firebaserc” at the root of the project.
THE END!
BONUS: Actually, an application architecture never ends. There is always a scope of improvement.
Let us see what next can be done to be more agile in development.
Step-10: ESLint
(ref: https://eslint.org)
Lint to Find and fix problems in your JavaScript code throughout the project. ESLint statically analyzes your code to quickly find problems. ESLint is built into most text editors and you can run ESLint as part of your continuous integration pipeline.
ESLint is shipped with creat-react-app. I suggest dont try to install again. I fell into a version conflict. Rather just init and add a “/eslintrc.json” file at the root of your project.
$ eslint — init
✓ select all the relevant options. This will create a “.eslintrc.json” file in the root of your project bearing all the linting rules.
Refer “https://github.com/yannickcr/eslint-plugin-react#configuration” for configuring various rules.
Use below command to apply the lint checker locally:
$ eslint src/**/*.js
You can also add a script in your package.json to run linter.
Step-11: Design Pattern
I wanted to revisit the design pattern topic. It is not given much importance by many in the initial phase of the project. Believe me, the project will soon become a mess when it is scaled up by adding more and more features. It will be a nightmare for production support and enhancements in existing features in absence of design pattern.
Read more about Design patterns in Section-1 > /pages
Step-12: CI — Continuous Integration
(ref: https://about.gitlab.com/blog/2020/03/16/gitlab-ci-cd-with-firebase/ & https://docs.gitlab.com/ee/ci/yaml/#introduction)
Adding a continuous integration pipeline for automatic + manual deployment will increase the productivity. One of the major advantages is the changes are immediately deployed on one of the servers and the web site can be tested. Thus, impact analysis becomes easy and developers can be sure that all the changes are pushed properly, nothing is left out.
I am not an expert on CI/CD or devops, although I will try to put out my experience.
The CI pipeline / job will use the same build scripts that are defined in our project’s package.json for local use. CI will simply automate the build and deploy process whenever someone commits any changes.
This configuration of test, build & deploy stages can be configured and managed in corresponding CI configuration file. In our case, we used gitlab’s CI/CD module.
Created a “.gitlab-ci.yml” file at the root of the project with all the necessary configurations.
Known issue:
My team struggled during our CI implementation for the react js project on gitlab. This was a gitlab CI issue. (https://gitlab.com/gitlab-org/gitlab-runner/-/issues/336)
Issue was “build artefact not found in deploy stage”
Gitlab CI doesn’t preserve artefact between stages. I.e. it removes/cleans ‘build’ directory which is our project bundle (artefact) after the build stage. Therefore, the deploy stage doesn’t find the same. We have to add configurations to preserve it between stages or run all the steps in a single stage.
We spent one whole day searching for the resolution. Hope this saves someone’s time.
Section-4 ONBOARDING
Development approach needs to be articulated and everyone in the team needs to be educated about the same.
It can also be added as a separate document.
It should be created scenario wise:
- Adding a whole new feature with multiple routes.
- Adding a new page.
- Adding components within a page.
- Modifying something.
- Any and every other development feature that can be covered including the commit and merge process to be followed.
References:
Various internet resources were used for coming up with a robust, scalable and suitable architecture for a react-native app.
https://reactjs.org/tutorial/tutorial.html#setup-option-2-local-development-environment
https://create-react-app.dev/docs/running-tests/
https://create-react-app.dev/docs/deployment
https://reactrouter.com/web/guides/quick-start
Apologies for adding images for code snippets.
I’ve tried to add pastebin / rentry links wherever possible for easy copy-paste.


My other stories:
- React Native setup — Industry standard:
https://medium.com/@saurabhshah23/perfect-react-native-application-setup-industry-standards-bd3cc623745e
😀Thank you😀
😀Clapping is motivating
😀Do not hesitate to applause
source : https://saurabhshah23.medium.com/react-js-architecture-features-folder-structure-design-pattern-70b7b9103f22
nice informative post. Thanks you for sharing.
ReplyDeleteWe are an experienced team in one of the Best software company and product specialist for software development and implementation.
ReactJs Development
Web development
nice informative post. Thanks you for sharing.
ReplyDeleteWe are an experienced team in one of the Best software company and product specialist for software development and implementation.
Hire React Developer in New York
As someone who is new to react development I really appreciate your efforts. This is really helpful.
ReplyDeleteVery useful Post. I found so many interesting stuff in your Blog especially its discussion. AT&T Software LLC comes with an incredible team of website and mobile application developers who can customize the perfect solutions to transform your business.
ReplyDeletehire angularjs developer
hire laravel developer
hire dedicated laravel developer