Monday, June 25, 2012

แก้ปัญหา A potentially dangerous Request.Form value was detected from the client ของ FreeTextBox

เคยไหมที่ใช้พวก wysiwyg ทั้งหลาย เช่น freetextbox ckeditor กับ asp.net  แล้วเจอ error: A potentially dangerous Request.Form value was detected from the client  วิธีแก้คือ ไปแก้ที่ file web.config ถ้าต้องการให้มีผลทั้งเว็บ หรือถ้าต้องการให้มีผลเฉพาะหน้าก็แก้ที่ไฟล์ .aspx อย่างเดียว


ทั้งเว็บ

<pages validateRequest="false">
เฉพาะไฟล์
<%@ Page Language="C#" AutoEventWireup="true" CodeFile="Default.aspx.cs" Inherits="Default" ValidateRequest="false" %>
ref : http://basketman.wordpress.com/2009/11/17/a-potentially-dangerous-request-form-value-was-detected-from-the-client-html-editor/

Performing Validation in TinyMCE Editor using ASP.Net Validation Controls

In this article I’ll be explaining how to validate TinyMCE Rich Text Editor or Rich TextBox. If you like to know more about adding TinyMCE editor in ASP.Net application, refer my following article
Directly if you try to add a normal Required Field validator it will simply validate the multiline textbox and not the TinyMCE Editor and gives you Required message. This is because TinyMCE adds its content to the multiline textbox or TextArea after the button is clicked. Hence the required field validators fail to validate it first time and throw validation failed error.
Due to this we might need to press the button twice to make the Form Post happen.
I’ll be explaining two technique to tackle the issue.
Technique 1
In Technique 1, we will force the TinyMCE to save to the content to TextArea or Multiline Textbox so that Required Field validators can validate it properly.
<form id="form1" runat="server">
<div>
<asp:TextBox ID="txtTinyMCE" runat="server" TextMode = "MultiLine"></asp:TextBox>
<asp:RequiredFieldValidator ID="RequiredFieldValidator1" ControlToValidate = "txtTinyMCE" runat="server"ErrorMessage="Required"></asp:RequiredFieldValidator>
<asp:Button ID="btnSave" runat="server" Text="Save" OnClientClick = "tinyMCE.triggerSave(false,true);" />
</div>
</form>

You just need to add OnClientClick event and call the TinyMCE method that will save the content to the TextArea. Thus validators will now find the content in TextArea and the PostBack will work.
Technique 2
Technique 2 makes use of a Custom Validator instead of a Required Field validator.
<form id="form1" runat="server">
<div>
<asp:TextBox ID="txtTinyMCE" runat="server" TextMode = "MultiLine"></asp:extBox>
<asp:CustomValidator ID="CustomValidator1" ClientValidationFunction = "ValidateTinyMCE" runat="server"ErrorMessage="Required"></asp:CustomValidator>
<asp:Button ID="btnSave" runat="server" Text="Save" />
</div>
</form>

The custom validator calls a JavaScript method (described below) which will validate the TinyMCE Editor and not the TextArea or multiline textbox
<script type = "text/javascript">
function ValidateTinyMCE(sender, args) {
    var isValid = false;
    var value = tinyMCE.get('<%=txtTinyMCE.ClientID%>').getContent();
    if (value == "") {
        args.IsValid = false;
    }
    else {
        //Check for space tag
        if (value == "<p>&nbsp;</p>") {
            //Clear TinyMCE
            tinyMCE.get('<%=txtTinyMCE.ClientID%>').execCommand('mceSetContent'false"");
            args.IsValid = false;
        }
        else {
            args.IsValid = true;
        }
    }
}
</script>

You just need to place the script in the BODY, HEAD OR ContentPlaceHolder section.
You can download the sample source code using the download link below.
TinyMCE_ASP.Net - Validation.zip

ref:http://www.aspsnippets.com/Articles/Performing-Validation-in-TinyMCE-Editor-using-ASP.Net-Validation-Controls.aspx

Highlight Input Controls when Validation fails in Asp.Net Validator controls

Asp.Net control set has a set of validation controls that offers input validations without writing a line of code. Often the functionalities provided by the validation controls are suffice to satisfy the validation requirements in our projects. At times, we may need to have a different behavior when compared to the Asp.Net validator controls for handling the input validations.
One of my previous article Restrict Asp.Net Validator controls to Fire on Page Submitdemonstrated customizing the Asp.Net validator controls to fire the validations only on click of submit button using JavaScript. Similarly, let’s see how we can highlight the input control (or the control in ControlToValidate) whenever the validation fails just to make the user to have a quick attention on the control to change its input in order to pass the validations.

This approach will provide a better user experience when our input forms have large number of input controls. Once this is in place, the users can identify the input control very easily that have the wrong data in a big input forms since it is highlighted. Something like below,
Change Background colour of TextBox when Validation fails in ASP.Net
To do this, I will use jQuery library for the client side scripting in this article. I assume you have created a new asp.net project in your visual studio to understand this article.
By default, when we use Asp.Net Validator controls the framework will emit a JavaScript array called Page_Validators in the output HTML populated with the list of Validator controls on the page. See Listing 1 below. This array will be in turn consumed by the inbuilt validation script emitted by Asp.Net (through WebResource.axd handler, you can see it in view source) along the page HTML for performing the validations on the client side.

Listing 1 – Validator Array
<script type="text/javascript">
//<![CDATA[
var Page_ValidationSummaries =  new Array(document.getElementById("ValidationSummary1"));
var Page_Validators =  new Array(document.getElementById("RequiredFieldValidator1"), document.getElementById("RequiredFieldValidator2"), document.getElementById("RegularExpressionValidator1"), document.getElementById("CompareValidator1"), document.getElementById("RangeValidator1"));
//]]>
</script>

Along with the above array, the Asp.Net also emits some data associated with every validation controls in the form of JavaScript object and let the inbuilt validation script consume it for performing the validations. See below,

Listing 2 – Validator Data
<script type="text/javascript">
//<![CDATA[
var RequiredFieldValidator1 = document.all ? document.all["RequiredFieldValidator1"] : document.getElementById("RequiredFieldValidator1");
RequiredFieldValidator1.controltovalidate = "txtName";
RequiredFieldValidator1.errormessage = "Name is mandatory";
RequiredFieldValidator1.display = "None";
RequiredFieldValidator1.evaluationfunction = "RequiredFieldValidatorEvaluateIsValid";
RequiredFieldValidator1.initialvalue = "";
var RequiredFieldValidator2 = document.all ? document.all["RequiredFieldValidator2"] : document.getElementById("RequiredFieldValidator2");
RequiredFieldValidator2.controltovalidate = "ddlGender";
RequiredFieldValidator2.errormessage = "Gender is mandatory";
RequiredFieldValidator2.display = "None";
RequiredFieldValidator2.evaluationfunction = "RequiredFieldValidatorEvaluateIsValid";
RequiredFieldValidator2.initialvalue = "0";
……trimmed for brevity
//]]>
</script>

We will make use of this information and with the help of jQuery let’s see how we can highlight the input control whenever the validation fails.
If we take a closer look at the data emitted by the Asp.Net framework in Listing 2, each validator control has a property called controltovalidate that holds the associated input control and initialvalue that holds the initial value the input control. The validator control will validate the input based on the initialvalue set in the property, in other words, the validation will fail if the initialvalue and value in input control matches for required field validations. The rest of the properties seen in the above listings are self explanatory. Apart from the above property each validator control has a property called isvalid which will return true or false based on the validation outcome. This property “isvalid” is the key of this article since it holds the validation outcome for individual validations.


The implementation
Firstly, we need to hook an onblur event handler for every input controls that is associated with each validator control in Page_Validators array. On this event, we can change the background (or highlight) based on the value of isvalid property. Assuming we have integrated the jQuery library in our project, I will dive into the code directly. Refer the below code,
<script src="_scripts/jquery-1.6.4.min.js" type="text/javascript"></script>
<script type="text/javascript">
    $(document).ready(function() {
        HighlightControlToValidate();
        $('#<%=btnSave.ClientID %>').click(function() {
            if (typeof (Page_Validators) != "undefined") {
                for (var i = 0; i < Page_Validators.length; i++) {
                    if (!Page_Validators[i].isvalid) {
                        $('#' + Page_Validators[i].controltovalidate).css("background", "#f3d74f");
                    }
                    else {
                        $('#' + Page_Validators[i].controltovalidate).css("background", "white");
                    }
                }
            }
        });
    });

    function HighlightControlToValidate() {
        if (typeof (Page_Validators) != "undefined") {
            for (var i = 0; i < Page_Validators.length; i++) {              
                $('#' + Page_Validators[i].controltovalidate).blur(function() {
                var validatorctrl = getValidatorUsingControl($(this).attr("ID"));                               
                    if (validatorctrl!= null && !validatorctrl.isvalid) {
                        $(this).css("background", "#f3d74f");
                    }
                    else {
                        $(this).css("background", "white");
                    }
                });
            }
        }
    }   
    function getValidatorUsingControl(controltovalidate) {      
        var length = Page_Validators.length;
        for (var j = 0; j < length; j++) {
            if (Page_Validators[j].controltovalidate == controltovalidate) {
                return Page_Validators[j];
            }
        }
        return null;
    }   
</script>

In the above code, I am setting the background color of the input control on onblur event and on onclick event of the submit button. This is because, the validation function associated with a validator control will be fired on both onblur and submit event. The key difference in setting the background color in both the event is how I am finding the associated validator control for an input control.
In onblur event, I am finding the associated validator control for a input control by passing its ID to getValidatorUsingControl() method. This method will search for the validator in the Page_Validators array and will return it, while this is not required in case of onclick or submit since every validator control needs to be fired when the submit button is clicked.

Downloads
Download Source

Conclusion
Since validations are integral part of any application we develop, it is also important that we provide a good user experience whenever we can offer to our users. This article discussed this in one way where we can provide a good user experience when we use the inbuilt validation controls available in Asp.Net.
Download the source attached with this article and see it in action.
Happy Coding!!

ref : http://www.codedigest.com/Articles/ASPNET/414_Highlight_Input_Controls_when_Validation_fails_in_AspNet_Validator_controls.aspx

Saturday, June 9, 2012

การใช้ syntax highlighter in blogger

      " ผมเริ่มต้นการเขียน blog บทความนี้ก็เป็นบมความแรกๆของการเขียน blog ขึ้นมาเลยครับ อืมรู้สึกว่าเขียนไม่ค่อยจะเป็น ใช้คำไม่ค่อยจะถูกยังงัยไม่รู้อะ (copy เนี้อหาของคนอื่นซะจนเคนตัวครับ 555 เนี่ยละครับเด็กไทย เลยคิดไม่ค่อยเป็น) จะพยายามเขียนให้ได้วันละเรื่องให้ได้ครับ ขอบคุณทุกคนที่เข้ามาเยียมชมใน blog ของผมนะครับ "
             ผมเคยเห็นโค้ดที่แสดง โค้ดของโปรแกรม รู้สึกว่ามันมีประโยชน์เวลาที่เราจะเอาcode ที่มีแสดงไว้ในบล็อกของผมเอง เผื่อว่าวันใดที่เราต้องการเอาCode มาใช้ภายหลังครับ วันนี้ผมลองเข้าไปใน blogger ทางด้าน IT มีการแสดง sourcecode ที่blog เลยสนใจที่จะลองใช้งานดูเผื่อว่าให้blogger นี้สามารถแสดง code ได้ โดยใช้ plugin SyntaxHighlighter โดยเจ้าตัว SyntaxHighlighter มีประโยชน์มากในการแสดงผลของcode programing ที่ต้องการจะแสดงไว้บน webserver หรือ ถ้ามีใช้งานเว็บ blogger ไว้ก็สามารถใช้งานได้โดยตรง

            สามารถ Download Systaxhighlighter ได้จากที่เว็บไซต์
                           Site:http://alexgorbatchev.com/wiki/SyntaxHighlighter:Download
                           Configuration Steps:http://alexgorbatchev.com/wiki/SyntaxHighlighter:Configuration
                           Brush Aliases:http://alexgorbatchev.com/wiki/SyntaxHighlighter:Brushes

แต่รู้สึกว่าถ้าเราโหลด v.ใหม่มาใช้อะครับ เวลาจะcopy code ที่โชว์อยู่มันจะไม่ขึ้นให้copy โหลดไปอะครับ แล้วแต่เว็บที่เคยเห็นมันมีให้ก็อบได้อะดิทำงัยดีวะ ก็เสียใช้เวลาคนหาวิธีการทำมาจนได้

ขั้นตอนการใช้งานมีขั้นตอนดังนี้

  • Login เข้าไปในเว็บblogerของเราเองแล้ว
  • ไปที่  Blogger Dashboard --> Design --> Edit HTML  เพื่อทำการแก้ไขหน้า template ของblog ให้สามารถแสดง  SyntaxHighlighter ได้ทุกเพจ

  • แก้ไข Template ในส่วนที่อยู่ใน tag  <head>...</head> เพื่อประกาศไว้ใช้ทุกเพจของเว็บโดยเพิ่ม code เข้าไป 


  • เมื่อต้องการแสดง code โดยใช้ SyntaxHighlighter ให้ขึ้นตั้นด้วยคำสั่ง <pre> แล้วตามด้วยcode ที่ต้องการแสดง แล้วปิดด้วย </pre> ในtag pre ระบุ ภาษาของ code ที่ต้องการแสดงไว้ด้วย <pre class="brush: c#">เพื่อให้  SyntaxHighlighter แสดงผลได้ถูกต้อง
<pre class="brush: BRUSH-NAME">

Paste Your Code Here

</pre>

Ex. C#
using System;
public class HelloWorld
{
    public static void Main(string[] args) {
 Console.Write("Hello World!");
    }
}

  • code ที่อยุ่ใน tag <pre></pre>จะต้อง Encoded string เพื่อแก้ปัญหาcode ที่แสดงเป็นภาษาต่างดาว

สามารถแปลงเป็นencode ได้จากเว็บไซต์ http://www.string-functions.com/htmlencode.aspx

 SyntaxHighlighter รองรับภาษา

LanguageAliases
C++cppcc++
C#c#c-sharpcsharp
CSScss
Delphidelphipascal
Javajava
Java Scriptjsjscriptjavascript
PHPphp
Pythonpypython
Rubyrbrubyrailsror
Sqlsql
VBvbvb.net
XML/HTMLxmlhtmlxhtmlxslt

Wednesday, June 6, 2012

Crystal Report Filtering Using Selection Parameters

Background

Selection parameters allow you to filter Data returned from datasource (Table in our case).
Of course, it's better and faster to use Stored Procedures (explained here), but it's good to learn about this useful feature.

Step 1: Database

  1. Download and unzip the attached file.
  2. Run the script to create the database and table.
  3. You should now have the following schema.
Schema.jpg
(I tried to use variations of data types, textdatetimefloat, etc.)

Step 2: Form

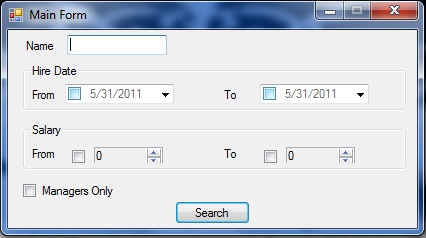
We’ll build the user input form, nothing fancy, textbox, datetimepicker and a customized numeric updown control.
(The numeric updown is augmented to have a Checked property, we’ll need that later.)
Main.jpg

Step 3: Report

Next, we’ll add a new report to our Reports folder, explained here.

Step 4: Report’s Parameters

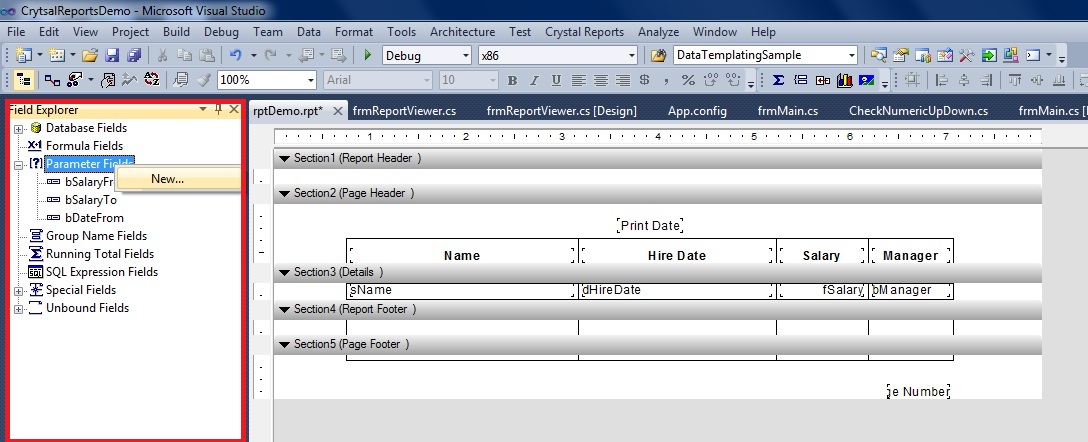
Very well, we have our report created; next, we want to create the parameters to be passed and searched with.
In addition to the 6 parameters on the user form, we need a Boolean parameter for each field, this Boolean tells us whether to include the field in search criteria or not.
We'll enter the first boolean to indicate if the From datetimepicker has value:
  1. In field explorer,right click Parameter fields>New (if you can't find field explorer, View>Other Windows>Document Outline or Ctrl+Alt+T)
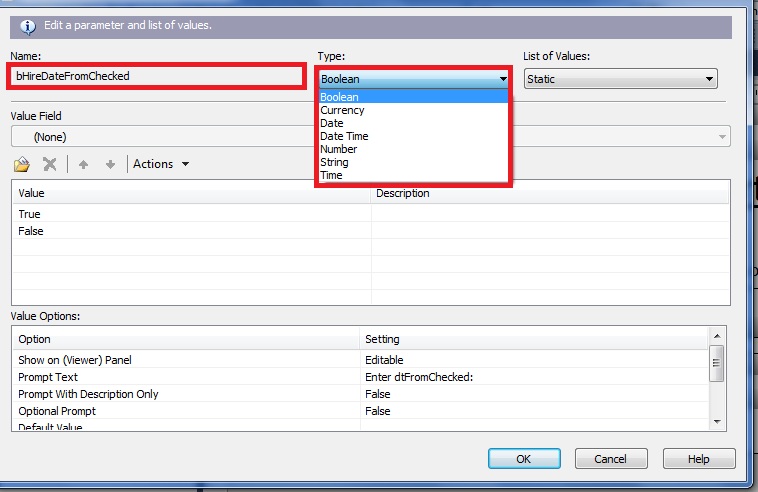
    Parameter_1.jpg
  2. Enter name bHireDateFromChecked and type boolean
    All_params.jpg
  3. Do this for the other fields. bHireDateToChecked bSalaryFromChecked etc…
We don’t need a Boolean to check if user wants to search by name, we’ll just inspect if the text length is greater than zero.
So now we’ve added the Booleans. Next, we’ll add the parameters that will be actually searched.
Similarly add the parameters, with the same datatype they are in database.
So now we have:
SelectDatabase.jpg

Step 5: Report’s Formulas

For each of our Main searchable parameters, we’ll create a formula, this formula examines the parameters attached Boolean, to decide whether to include it in the search or not.
So let’s add a new formula:
  1. Open Field Explorer
  2. Right click Formula Fields>New
  3. Enter nameHireDateFrom
After you click ok,this window appears:
SelectTable.jpg
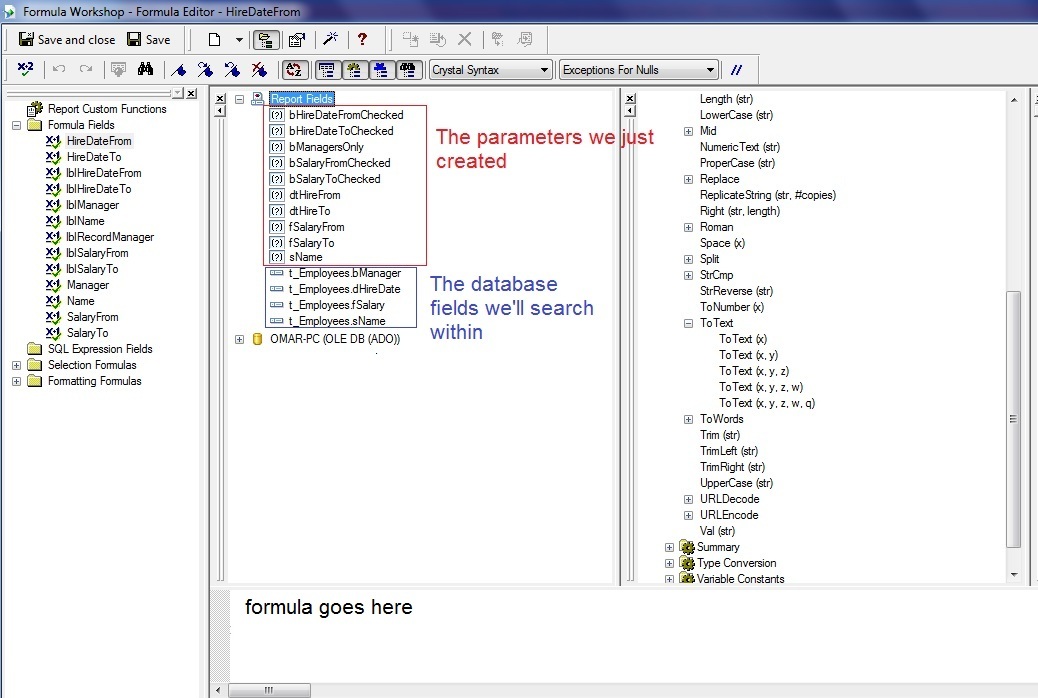
You have all the parameters you created, if you double click on one of them, it's written into the editor. Great!
So now we’ll write the following formula while clicking parameters of the above panel.
if (double click bHireDateFromChecked) then 
double click t_Employees.dHireDate >= double click dtHireFrom 
Else 
True  
So now you should have the following:
IF({?bHireDateFromChecked}) THEN
    {t_Employees.dHireDate}>={?dtHireFrom}
ELSE
    TRUE 
Click save and close on the top left.
Similarly, create the formula HireDateTo, which is:
IF({?bHireDateToChecked})THEN
    {t_Employees.dHireDate}<={?dtHireTo}
ELSE
    TRUE
Similarly create another 2 formulas for salaryfrom and to.
For the name field, we’ll take a different approach, we’ll check the passed parameter’s length.
(Notice the functions panel in the middle, like the formulas, functions are written into the editor once you double click on one of them.)
Expand Strings in the Functions Panel.
Write:
IF(double click length double click sName)>0)THEN
double click t_Employees.sName = double click sName 
ELSE
TRUE 
And now you should have:
IF(Length ({?sName})>0)THEN
    {t_Employees.sName}={?sName}
ELSE
    TRUE

Step 6: Selection Parameters

Right click in the empty grey of the report>Report>selection formula>record.
Like the parameters, the formulas we just created are available in the editor.
FieldExplorer.jpg
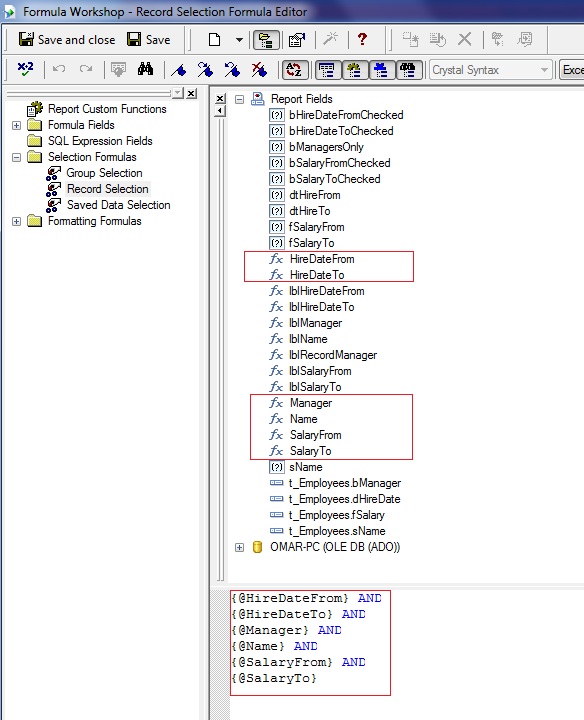
Now all we have to do is to join these formulas using the logical operator AND.
  1. Double click on each formula to be written in the editor
  2. Write AND between each formula
..and you should end up with this:
{@HireDateFrom} AND
{@HireDateTo} AND
{@Manager} AND
{@Name} AND
{@SalaryFrom} AND
{@SalaryTo}

Points of Interest

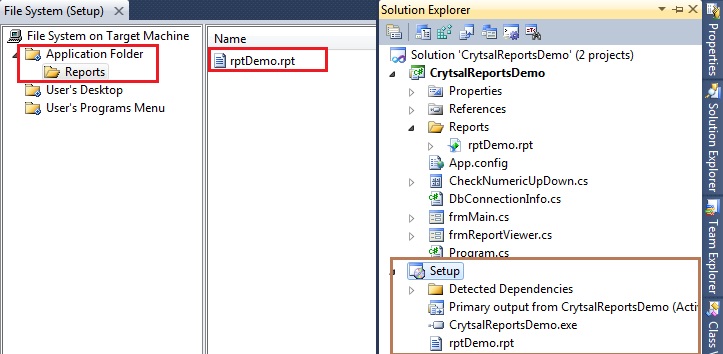
You design the report in one place, then copy it somewhere else.

The report included in the application (the one you see under solution explorer->Reports Folder) is NOT the one the report viewer references to, the actual path is this:
string strReportName = "rptDemo.rpt";
string strPath = Application.StartupPath + "\\Reports\\" + strReportName;
which is the application's bin>Debug WHY?
In a Desktop application, when you want to deploy and add a setup project, this will be the path of the addedReport's Folder.
Deploy.jpg

You should NOT hard-code your Connection String.

Almost every CR tutorial I've seen uses hard-coded Connection Strings (they use Datatables too, someone tell me why?)
You should make use of little helpful class called DbConnectionInfo (not mine, unfortunately I can't remember the author to give him credit.)
private void frmReportViewer_Load(object sender, EventArgs e)
        {
            DbConnectionInfo.SetConnectionString(ConfigurationSettings.AppSettings[0]);
            TableLogOnInfo logOnInfo;
            ConnectionInfo connectionInfo;
            foreach (Table table in m_cryRpt.Database.Tables)
            {
                logOnInfo = table.LogOnInfo;
                connectionInfo = logOnInfo.ConnectionInfo;
                // Set the Connection parameters.
                connectionInfo.DatabaseName = DbConnectionInfo.InitialCatalog;
                connectionInfo.ServerName = DbConnectionInfo.ServerName;
                if (!DbConnectionInfo.UseIntegratedSecurity)
                {
                    connectionInfo.Password = DbConnectionInfo.Password;
                    connectionInfo.UserID = DbConnectionInfo.UserName;
                }
                else
                {
                    connectionInfo.IntegratedSecurity = true;
                }
                table.ApplyLogOnInfo(logOnInfo);
            }

            crystalReportViewer1.ReportSource = m_cryRpt;
            crystalReportViewer1.Refresh();
        }

You should let the user know what he entered.

ReportHeader.jpg
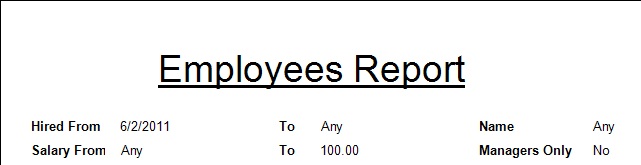
Always display the parameters the user entered in a friendly way.
For example, the formula lblHireDateFrom displays the entered From date:
IF({?bHireDateFromChecked}) THEN
   ToText ({?dtHireFrom})
ELSE
    'Any'


ref : http://www.codeproject.com/Articles/205398/Crystal-Report-Filtering-Using-Selection-Parameter