Thursday, June 27, 2013

Separator Line on Form [C#]

This example shows how to create a bevel line in Windows Forms. This line can be used as a visual separator of controls on a form.
Bevel line
To simulate the line in Windows Forms use a Label control. Set its Height to 2 pixels and BorderStyle to Fixed3D. Thats all, see the example.
[C#]
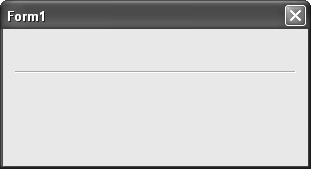
// separator bevel line
label1.AutoSize = false;
label1.Height = 2;
label1.BorderStyle = BorderStyle.Fixed3D;
 
source : http://www.csharp-examples.net/separator-line/ 

Wednesday, June 19, 2013

C# dataset insert to database and Table Value Parameters

Introduction

In this article, we explore the SQL server 2008 Table value parameters. Many articles have been published on this subject, some describe the SQL server side of things, others discuss how to access the table value functions from .NET.
I was unable to find one crisp article just describing a simple example of how to use Table value parameters using C# and SQL Server 2008 and after some research, I wrote this article so that other individuals may benefit from my findings.
Table value parameters are a simple mechanism to pass bulk of data from ADO.NET to SQL Server. They allow data to be available on the SQL Server as a temporary table.
This task in the past was done using XML in which the bulk data was modelled in a hierarchical structure and passed to the stored procedure. The stored procedure then converted back the structure into a temporary table to process the data in a relational manner.

Audience

The audience of this article is expected to be aware of ADO.NET, C# and SQL Server 2008.

Objective

To demonstrate an end to end example of table value parameters.

The Code

We will directly jump into the code for this article. We shall discuses each layer from the SQL Server Table to the C# code.

The Database Table

In this section, we describe the table schema for the sample problem. The table in this code will be a simple table with an identity column along with a nvarchar and integer column. The nvarchar column will not allow nulls and the integer will allow nulls. The schema creations script for the same is:
--This is the database table
CREATE TABLE dbo.SampleTable
(
Id int NOT NULL IDENTITY (1, 1),
SampleString nvarchar(64) NOT NULL,
SampleInt int NULL
) ON [PRIMARY]

The Table Value Parameter Type

To pass the data along as a table value parameter, a new database type has to be created. This type definition in essence describes what one row will look like and we will pass around a bunch of such rows. The script for the same is:
-- Create a table data type
CREATE TYPE [dbo].[SampleDataType] As Table
(
--This type has structure similar to the DB table 
SampleString Nvarchar(64) Not Null -- Having one String
, SampleInt Int -- and one int
)
One may observe that the structure of this type is similar to the table, however what is important is that we need to create the type definition most convenient to pass along the data which may mean de-normalization.

The Stored Procedure

The stored procedure is a rather simple piece of code which takes the SampleDataType type as input parameter. Inside the stored procedure, the parameter is available as a temporary table. This table however has to be readonly.
--This is the Stored Procedure
CREATE PROCEDURE [dbo].[SampleProcedure]
(
-- which accepts one table value parameter. 
-- It should be noted that the parameter is readonly
@Sample As [dbo].[SampleDataType] Readonly
)
AS

Begin
-- We simply insert values into the DB table from the parameter
-- The table value parameter can be used like a table with only read rights
Insert Into SampleTable(SampleString,SampleInt)
Select SampleString, SampleInt From @Sample
End

The DB Test Script

At this stage, we should quickly test our database for any errors using this script, which also describe the mechanism using which table value parameters may be passed along from one stored procedure to other.
-- This is the sample script to test the SP
-- An instance of the Table parameter type is created
Declare @SampelData As [dbo].[SampleDataType]
-- and then filled with the set of values
Insert Into @SampelData(SampleString, SampleInt) Values('1',1);
Insert Into @SampelData(SampleString, SampleInt) Values('2',null);
Insert Into @SampelData(SampleString, SampleInt) Values('3',3);
Select * From @SampelData
-- we then call the SP to store the values
Exec SampleProcedure @SampelData
Select * From SampleTable

The C# Code

In the C# code, we have to resolve two problems to use the required stored procedure.
  1. Create a data structure which is equivalent to the table value parameter - just the way a nvarchar is represented as string on the C# end.
  2. Pass this data to the Stored procedure.

Representing the Data

There are many mechanisms available to represent the data such as representing the data as a DataTable,IEnumerable, Linq object, Data reader, etc. In this article, we will focus on the DataTable. All we do is create aDataTable, define columns parallel to our Table data type and fill them up.
//To represent the table parameter in C#, we need to either 
//have a set of entities which are IEnumreable 
//or a data reader or a Data table.
//In this example we create a data table with same name as the type we have in the DB 
DataTable dataTable = new DataTable("SampleDataType"); 
//we create column names as per the type in DB 
dataTable.Columns.Add("SampleString", typeof(string)); 
dataTable.Columns.Add("SampleInt", typeof(Int32)); 
//and fill in some values 
dataTable.Rows.Add("99", 99); 
dataTable.Rows.Add("98", null); 
dataTable.Rows.Add("97", 99); 

Passing the Data

To pass the data, it is to be represented as a SqlParameter. The type of this parameter is Structured. The details are as shown in the code snippet. The other code to call the SP is trivial and may be seen in the given code.
SqlParameter parameter = new SqlParameter(); 
//The parameter for the SP must be of SqlDbType.Structured 
parameter.ParameterName="@Sample"; 
parameter.SqlDbType = System.Data.SqlDbType.Structured; 
parameter.Value = dataTable; 
command.Parameters.Add(parameter); 
Please note that the attached code is developed in Visual Studio 2010 + SQL Server 2008 however it will work with Visual Studio 2005 and SQL Server 2008.

source : http://www.codeproject.com/Articles/39161/C-and-Table-Value-Parameters


CREATE TYPE dbo.MyDataTable -- you can be more speciifc here
AS TABLE
(
  col1 INT,
  col2 DATETIME
  -- etc etc. The columns you have in your data table.
);
GO

CREATE PROCEDURE dbo.InsertMyDataTable
  @dt AS dbo.MyDataTable READONLY
AS
BEGIN
  SET NOCOUNT ON;

  INSERT dbo.RealTable(column list) SELECT column list FROM @dt;
END
GO
Now in your C# code:
DataTable tvp = new DataTable();
// define / populate DataTable

using (connectionObject)
{
    SqlCommand cmd = new SqlCommand("dbo.InsertMyDataTable", connectionObject);
    cmd.CommandType = CommandType.StoredProcedure;
    SqlParameter tvparam = cmd.Parameters.AddWithValue("@dt", tvp);
    tvparam.SqlDbType = SqlDbType.Structured;
    cmd.ExecuteNonQuery();
}
If you had given more specific details in your question, I would have given a more specific answer.
source : 

Visual Studio 2010, Build error, Build (web): Object reference not set to an instance of an object

Visual Studio 2010, Build error, Build (web): Object reference not set to an instance of an object

When upgrading a from previous version, Crystal report build provider will cause builder error, in ASP.NET 4 crystal reports are also pre-compiled using build provider for (.rpt), when compiler tries to pre-compile reports build in previous version, a build error "Object reference not set to an instance of an object" is thrown and build fails.

Possible work arround is to remove the build provider for (*.rpt) in your web.config:

There will be following construct under section:

<buildProviders>
<add extension=".rpt" type="CrystalDecisions.Web.Compilation.RptBuildProvider, CrystalDecisions.Web, Version=14.0.2000.0, Culture=neutral, PublicKeyToken=692fbea5521e1304"/>
</buildProviders>

We can change this to:

<buildProviders>
<add extension=".rpt" type="CrystalDecisions.Web.Compilation.RptBuildProvider, CrystalDecisions.Web, Version=14.0.2000.0, Culture=neutral, PublicKeyToken=692fbea5521e1304"/>
<remove extension=".rpt"/>
</buildProviders>
What we have done is removed the build provider for (.rpt), in this way the crystal reports will remain as it is and no build error will show.

resource : http://software-works.blogspot.com/2010/05/visual-studio-2010-build-error-build.html

Sunday, June 16, 2013

Abstract, Interface Programming

ก่อนหน้านี้ เราก็ได้มีการพูดถึงเรื่องของ OOP กันมาบ้างเล็กน้อย ซึ่งก็ทำให้เราได้รู้ว่า คุณลักษณะสำคัญต่างๆของ OOP ที่จำเป็นต้องมีนั้น ก็ประกอบด้วย Encapsulation, Inheritance และ Polymorphism ซึ่งแต่ละองค์ประกอบนั้น ก็ถูกแบ่งออกเป็นคุณลักษณะของแต่ละภาษาออกไปตามแต่ละไวยากรณ์ของภาษานั้นๆ แต่ก็ยังมีวิธีการทำงานที่คล้ายๆกันอยู่

บทความนี้ ซึ่งจะกล่าวถึง Abstract Class และ Interface Programming นั้น จะถือว่าถูกจัดอยู่ใน Polymorphism หรือก็คือความหลากหลายนั่นเอง ซึ่งจะอธิบายออกมาด้วยไวยากรณ์ของภาษา Java เพราะเป็นภาษาที่ทำความเข้าใจได้ง่ายกว่า C++ ในหลายๆลักษณะ และเป็นภาษาที่มีผู้เริ่มต้นในการศึกษาการโปรแกรมมิ่ง ศึกษาอยู่มากพอสมควร

ก่อนอื่น เราควรจะเข้าใจความหมายของ Abstract Class และ Interface Programming ให้ดีก่อน เพื่อที่จะได้ศึกษาได้อย่างถูกทาง

Abstract Class -> Class ที่ทำหน้าที่มาเป็น Super Class สำหรับเพื่อให้สืบทอดโดยเฉพาะ โดยจะไม่สามารถนำมาสร้างเป็น Instance เองได้ โดยคลาสลูก จะต้องสืบทอด และ ทำการ เขียนการทำงานใหม่(Override) ให้ Abstract Method ทั้งหมด

Interface -> เป็นคุณสมบัติเพื่อให้ Class ทำการ Implement (คล้ายการสืบทอด) ใช้เพื่อเพิ่มคุณสมบัติให้ Class นั้นๆ โดยจะต้องทำการ Override Method ต่างๆใน Interface ให้หมด

Abstract Class


เมื่ออ่านมาถึงตอนนี้ อาจมีผู้อ่านบางคนสงสัยว่า Abstract Class นั้น มีความจำเป็นอย่างไร เนื่องจากหากเราจะสร้าง Class ขึ้นมา Class หนึ่งแล้ว ทำไมเราจึงจะต้องไม่ให้ Class นั้นๆ สามารถสร้าง Instance ขึ้นมาด้วย น่าจะสร้างขึ้นมาให้เป็น Class ปกติ ก็ยังสามารถถูกสืบทอดได้อยู่ดี

คำตอบในส่วนนี้ หากจะอธิบายแล้ว คงต้องอธิบายด้วยการยกตัวอย่าง จะเข้าใจง่ายที่สุด เริ่มด้วยการแสดงถึงโครงสร้างของการสืบทอด ดังข้างล่างจะดีกว่า


จากรูปด้านบน เป็นการแสดงการสืบทอด โดยจะมี Superclass เป็น Class ชื่อ Shape(รูปร่าง) ซึ่งจะมี Class ที่มาสืบทอด ก็คือ Circle(วงกลม) Triangle(สามเหลี่ยม) และ Rectangle(สี่เหลี่ยม)

ทีนี้้ เราต้องการที่จะบังคับให้แต่ละ Class ที่สืบทอดจาก Shape มีความสามารถในการ "หาพื้นที่" (calArea()) ซึ่งเราสามารถทำได้ โดยกำหนดให้ Class Shape นั้น มี Method calArea() ขึ้นมา และเมื่อ Class ใดๆ ทำการสืบทอด Class Shape ไปแล้ว ก็จะถูกบังคับให้สืบทอด Method calArea() ไปด้วย

แต่เนื่องจาก รูปร่าง(Shape) นั้น เป็นสิ่งที่ถูกสมมุติขึ้นมา ไม่มีรูปร่างที่แน่นอน จึงไม่สามารถเขียนการทำงานภายใต้ Method calArea() ได้ เราจึงต้องสร้าง calArea() ของ Shape ให้เป็น Abstract Method เพื่อที่จะได้ไม่ต้องกำหนดการทำงานให้ Method นี้

Class Shape
public abstract class Shape {
public abstract float calArea();
}

เมื่อ Class ที่เหลือทั้ง 3 ทำการสืบทอด Class Shape ไปแล้ว ก็จำเป็นต้องทำการ Override Abstract Method ของ Superclass ทั้งหมด


Class Circle
public class Circle extends Shape {
double radius;
public Circle(double radius)
{
this.radius = radius;
}

@Override
public double calArea() {
return Math.PI * Math.pow(radius, 2);
}
}


Class Rectangle
public class Rectangle extends Shape {
double lenght;
double height;


public Rectangle(double lenght, double height)
{
this.lenght = lenght;
this.height = height;
}

@Override
public double calArea() {
return lenght * height;
}
}


Class Triangle
public class Triangle extends Shape {
double base;
double height;


public Triangle(double base, double height)
{
this.base = base;
this.height = height;
}

@Override
public double calArea() {
return base * height * 0.5;
}
}

เราก็จะสามารถเรียกใช้ใน main() ได้ดังนี้

public class MainClass {
public static void main(String[] args) {
Circle c = new Circle(5);
Triangle t = new Triangle(3, 6);
Rectangle r = new Rectangle(10, 5);

System.out.println(c.calArea());
System.out.println(t.calArea());
System.out.println(r.calArea());
}
}


ซึ่งก็เหมือนว่า การทำงานของเราจะสมบูรณ์แล้ว แต่หากเราลองคิดว่า เรามี Class ที่สืบทอดมาจาก Shape ซักร้อย Class ซึ่งการเรียก calArea() ทีละ Class นั้น เป็นการทำงานที่ยากมาก ถ้าเราจะต้องไล่เขียนโค้ดไปทีละ Class และหากมีการเปลี่ยนแปลงการทำงานบางอย่าง ก็คงจะยากในการแก้ไขเช่นกัน

เนื่องจากแต่ละ Class สืบทอดมาจาก Class เดียวกัน เราจึงสามารถนำ Class ทั้ง 3 ชนิดนี้ หรือจะซัก ร้อยพันชนิด ที่สืบทอดมาจาก Class นี้ มาเก็บใน Array เดียวกัน และวนลูปทำได้

public class MainClass {
public static void main(String[] args) {
Shape[] s = {new Circle(5), new Triangle(3, 6), new Rectangle(10, 5)};
for(int i = 0; i < s.length; i++)
System.out.println(s[i].calArea());
}
}

วิธีนี้ จะมีประโยชน์มาก เมื่อเราต้องใช้ Class ที่หลากหลายชนิด แต่ก็ถือว่าเป็นชนิดเดียวกัน (Subclass is a Superclass) ซึ่งทำให้เราไม่ต้องเขียนการควบคุมหลายๆครั้ง กับการทำงานชนิดเดียวกัน

นอกจากนี้ เรายังสามารถนำวิธีนี้ มาใช้กับการส่งผ่าน Parameter ที่เราต้องการควบคุมขอบเขตของชนิดของ Argument ได้อีกด้วย


public class MainClass {
private static void printShape(Shape shape)
{
System.out.println(shape.calArea());
}

public static void main(String[] args) {
Circle c = new Circle(5);
Triangle t = new Triangle(3, 6);
Rectangle r = new Rectangle(10, 5);

printShape(c);
printShape(t);
printShape(r);
}
}


Interface


เรื่องของ Interface นั้น หากจะศึกษา ควรจะทำการศึกษาเรื่องของ Abstract Class ให้เข้าใจเสียก่อน เพราะ Interface นั้น แม้แนวคิดการทำงานจะต่างกัน แต่การนำมาใช้นั้น คล้ายกันมาก

เมื่อพูดถึง Interface แล้ว เราก็มักจะนึกถึง คุณสมบัติต่างๆ ที่นำมาเพิ่มให้กับ Class เช่นสมมุติว่า เรามี Interface 2 ตัว ชื่อว่า IFlyAble(บินได้) กับ IRunAble(วิ่งได้) โดยเรากำหนดให้ Interface ทั้ง 2 มีลักษณะดังนี้

public interface IFlyAble {
public void Fly();
}


public interface IRunAble {
public void Run();
}

และเราก็มี Class ขึ้นมาอีก 3 Class คือ Human(คน), Bird(นก) และ Plane(เครื่องบิน) โดย Human นั้น สามารถวิ่งได้ Bird สามารถบินได้ และ Plane ทำได้ทั้งวิ่งและบิน

ซึ่งเมื่อเราเอาทั้ง 3 Class มาเขียนเป็น Code แล้ว เราก็ต้องทำการ Override Method ทั้งหมดของ Interface ที่แต่ละ Class ทำการ Implement มา

public class Human implements IRunAble {
@Override
public void Run() {
System.out.println("Human Run");
}
}

public class Bird implements IFlyAble{
@Override
public void Fly() {
System.out.println("Bird Fly");
}
}

public class Plane implements IFlyAble, IRunAble{
@Override
public void Run() {
System.out.println("Plane Run");
}


@Override
public void Fly() {
System.out.println("Plane Fly");
}
}

ทีนี้ เราจะลองสร้าง Method ขึ้นมา ชื่อว่า goFly() กับ goRun() โดยที่กำหนดว่า Argument ที่ถูกส่งมานั้น หากส่งเข้า goFly() ก็จะต้องบินได้ (implement IFlyAble) และ หากส่งเข้า goRun() ก็จะต้องวิ่งได้ (implement IRunAble) เช่นกัน

private static void goFly(IFlyAble flyAble)
{
flyAble.Fly();
}

private static void goRun(IRunAble runAble)
{
runAble.Run();
}
เราก็สามารถนำมาเรียกใช้ใน main ได้ดังนี้

public static void main(String[] args) {
Human h = new Human();
Bird b = new Bird();
Plane p = new Plane();

goRun(h);
goFly(b);
goRun(p);
goFly(p);
}
แต่เราไม่สามารถสั่งคนไปบินได้ เพราะคนบินไม่ได้(ไม่ได้ implement IFlyAble) การเรียก Code ลักษณะนี้จึงทำไม่ได้

goFly(h);

ประโยชน์ของการใช้ Interface นั้น เรามักจะใช้เมื่อผู้สร้าง Method ต้องการกำหนดว่า Class ใดๆ ที่จะถูกส่งมาเป็น Argument จะต้องมีคุณสมบัติตามที่กำหนดไว้ หรือก็คือการ Implement Interface ที่กำหนดไว้นั่นเอง เพราะในความเป็นจริง ผู้ที่สร้าง Method กับผู้ที่สร้าง Class อาจเป็นคนละคนกัน และอาจไม่เคยคุยกันหรือเจอกันเลยซักครั้งก็ได้ จึงไม่อาจสื่อสารให้ Class ที่ส่งเข้ามา มีคุณสมบัติเพียงพอต่อการนำไปใช้ ฉะนั้น ผู้สร้าง Method จึงทำการสร้าง Interface ขึ้นมา และกำหนดว่า หากใครก็ตาม ต้องการที่จะนำ Class ใดๆส่งมาเป็น Argument แล้ว ก็ต้องทำการ implement interface นั้นๆด้วย

หลังจากที่ได้พูดถึงทั้ง Abstract Class และ Interface มาอย่างยาวนาน ก็คิดว่าทุกคนคงได้อะไรไปไม่มากก็น้อยบ้าง ขอให้ทุกคนลองนำวิธีการนี้ ไปใช้ในการเขียนบ้าง เพราะคงช่วยลดเวลาในการทำงาน ไม่มาก ก็น้อย :)

Wednesday, June 12, 2013

Problem during ClickOnce deployment.

I just finished figuring out a problem I was having with a ClickOnce deployment for a project I've been working on.

This project has a reference to ADODB.dll -- a Primary Interop Reference provided by Microsoft in the .NET Framework SDK. Unfortunately, that PIA isn't provided in the .NET Framework redistributable. Also, unfortunately, setting the adodb.dll to copy-local during the project-build process didn't help during ClickOnce deployment -- the ADODB.dll was specified as needing to be installed into the GAC before my app would install.

I did some searching around, and stumbled upon this post as the MSDN ClickOnce forums:

http://forums.microsoft.com/MSDN/ShowPost.aspx?PostID=323832&SiteID=1

You can find my response there, but if you're averse to clicking, read-on.

Basically, the problem boils down to the default ClickOnce publishing behavior for the ADODB PIA. For whatever reason, it marks the ADODB PIA as a pre-requisite in the applications .manifest file. This means that ClickOnce requires the ADODB PIA to be installed into the GAC before it will allow my app to be installed. Unfortunately, none of the bootstrapper pre-reqs installed the PIA into the GAC, (making one of those pre-req bootstrapper installers is a possible solution, and I mention it in the reply, but it's not the easiest solution.)

What fixes is the problem is modifying the 'Publish Status' of the ADODB.dll
in the project's ClickOnce publishing settings. You change ADODB.dll's publish-status from the default "Include (Auto)" to "Include".

Yes. 

Change it from one setting to another setting that appears to be the exact samesetting.
Re-publish. The applications .manifest now specifies ADODB.dll to 'install' -- which will cause ClickOnce to copy it to the install folder, instead of requiring it be installed into the GAC.


Here's a couple screen shots for ya:

Bring up your Project Properties Page, and go to the Publish tab. Click the "Application Files..." button:

In the dialog that pops up, set ADODB.dll's Publish Status to Include:

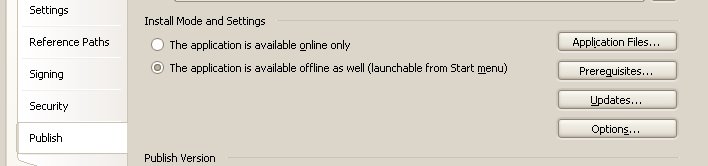
source : http://yoopergeek.blogspot.com/2006/03/problem-during-clickonce-deployment.html