
โครงสร้าง ตาราง และข้อมูล ของ SQL Server สำหรับทดสอบ
01.USE [mydatabase]02.GO03./****** Object: Table [dbo].[customer] Script Date: 03/13/2012 13:42:18 ******/04.SET ANSI_NULLS ON05.GO06.SET QUOTED_IDENTIFIER ON07.GO08.SET ANSI_PADDING ON09.GO10.CREATE TABLE [dbo].[customer](11.[CustomerID] [varchar](4) NOT NULL,12.[Name] [varchar](50) NULL,13.[Email] [varchar](50) NULL,14.[CountryCode] [varchar](2) NULL,15.[Budget] [float] NULL,16.[Used] [float] NULL,17.CONSTRAINT [PK_customer] PRIMARY KEY CLUSTERED18.(19.[CustomerID] ASC20.)WITH (PAD_INDEX = OFF, STATISTICS_NORECOMPUTE = OFF, IGNORE_DUP_KEY = OFF, ALLOW_ROW_LOCKS = ON, ALLOW_PAGE_LOCKS = ON) ON [PRIMARY]21.) ON [PRIMARY]22. 23.INSERT INTO customer VALUES ('C001', 'Win Weerachai', 'win.weerachai@thaicreate.com', 'TH', 1000000, 600000);24.INSERT INTO customer VALUES ('C002', 'John Smith', 'john.smith@thaicreate.com', 'EN', 2000000, 800000);25.INSERT INTO customer VALUES ('C003', 'Jame Born', 'jame.born@thaicreate.com', 'US', 3000000, 600000);26.INSERT INTO customer VALUES ('C004', 'Chalee Angel', 'chalee.angel@thaicreate.com', 'US', 4000000, 100000);27. 28.GO29.SET ANSI_PADDING OFFนำ Query ไปรันหรือสร้าง Database ตามโครงสร้าง

ตัวอย่างตารางและข้อมูล
มาเริ่มกันเลย
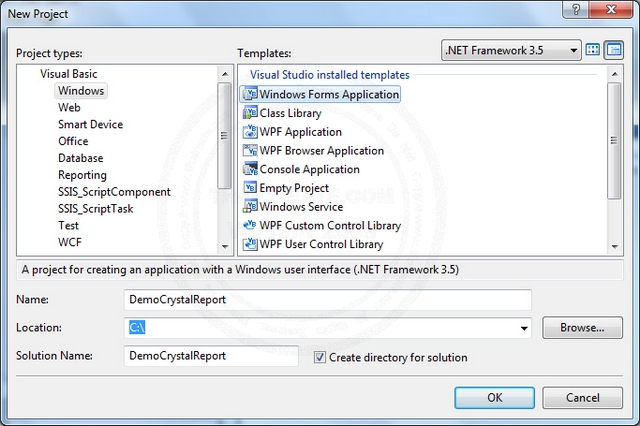
เริ่มต้นด้วยการสร้าง Project ขึ้นมาใหม่ เลือกเป็น Visual Basic (VB.NET) หรือ Visual C# ก็แล้วแต่ถนัด แต่ในส่วนของ Templates ให้เลือกเป็น Windows Form Application
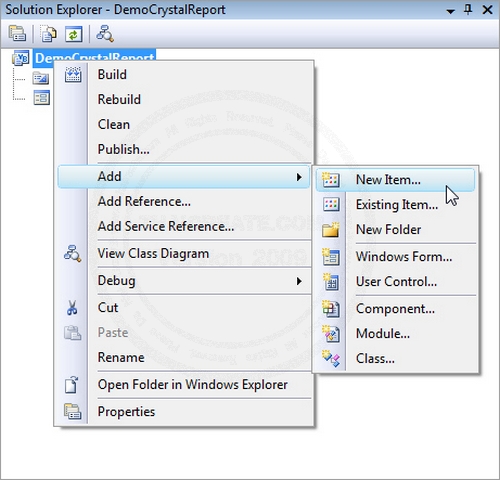
กลับมาที่หน้า Project ให้คลิกขวาที่ Project -> Add -> New Item
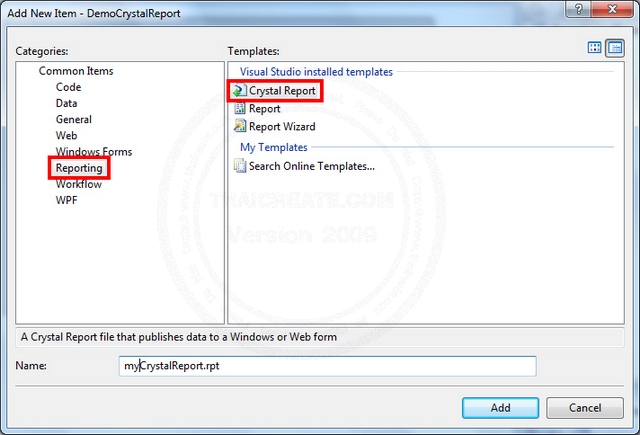
เลือก Crystal Report ให้กำหนดชื่อให้เรียบร้อย
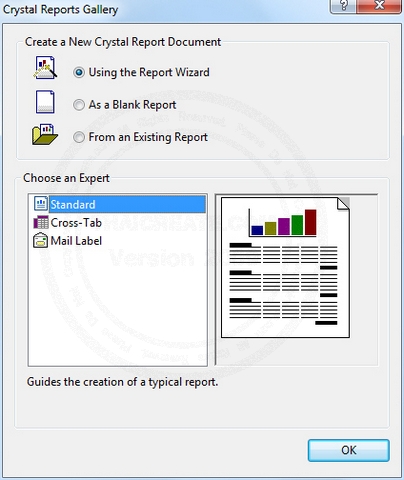
จะมีหน้าต่าง Pop ขึ้นให้เลือก Using the Report Wizard และ OK
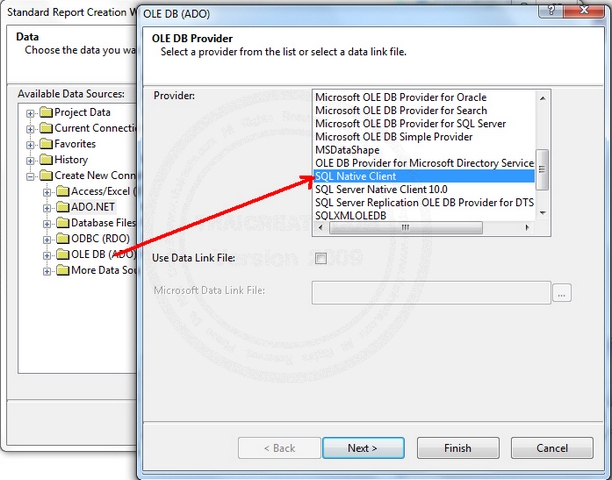
อันนี้เลือก Create New Connection ส่วน Database ไหนก็ขึ้นอยู่ว่าจะเรียก Report จาก Database อะไร ในที่นี้จะใช้ SQL Server ให้เลือก SQL Native Client
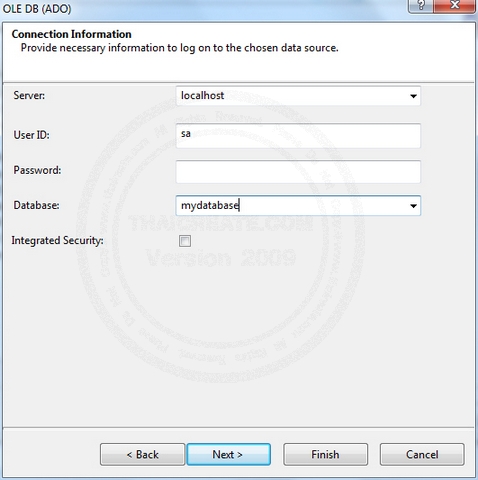
กำหนด Connection เช่น Server, User ID: , Password: , และ Database
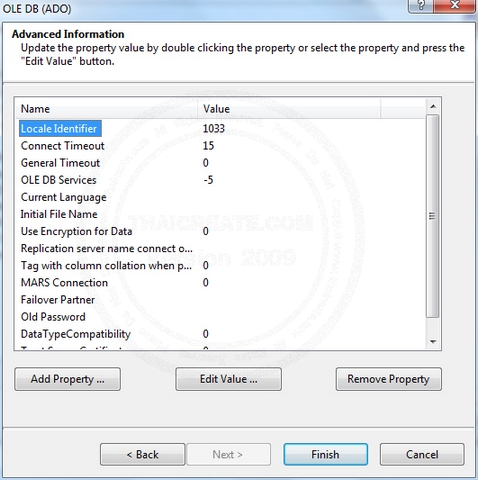
เลือก Finish เพื่อข้ามไปขั้นตอนถัดไป
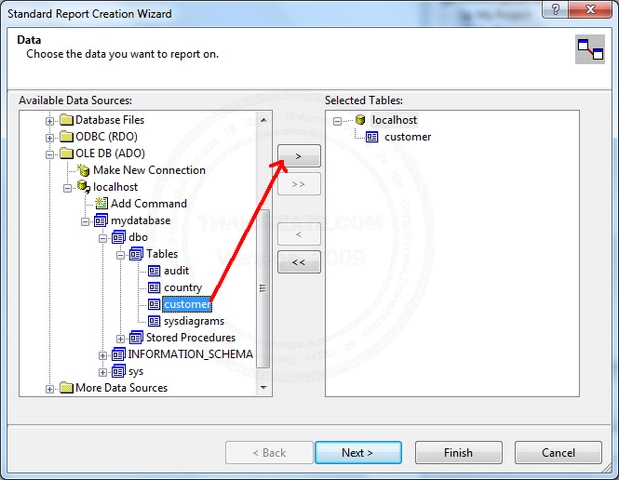
คลิกที่ Connection ที่ได้สร้างไปเมื่อกี่ และคลิกเพื่อเลือกชื่อตารางข้อมูล ซึ่งใน SQL Server จะอยู่ใน Sub ชื่อฐานข้อมูล -> dbo -> Tables -> ชื่อตาราง ส่วนถ้าเป็น Database อื่น ๆ ก็อาจจะแสดงชื่อตารางออกมาเลย
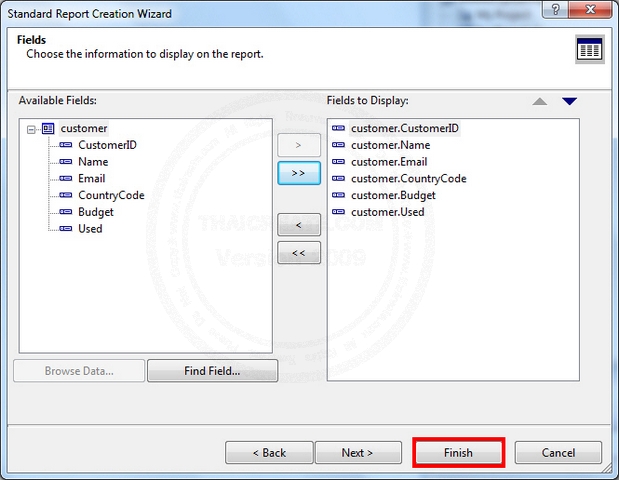
เลือกฟิวด์ Fields ข้อมูลทีต้องการแสดงใน Report และคลิกที่ Finish เพื่อเสร็จสิ้นการออกแบบ แต่ถ้าหากต้องการกำหนดค่าอื่น ๆ ของ Report ลองคลิกที่ Next เพื่อปรับแต่ง Report
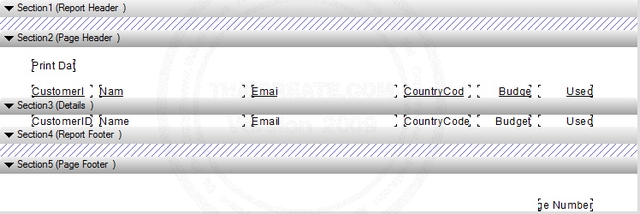
หน้าตา Design Report ที่สามารถปรับแต่งรายละเอียดอื่น ๆ ได้ตามความต้องการ
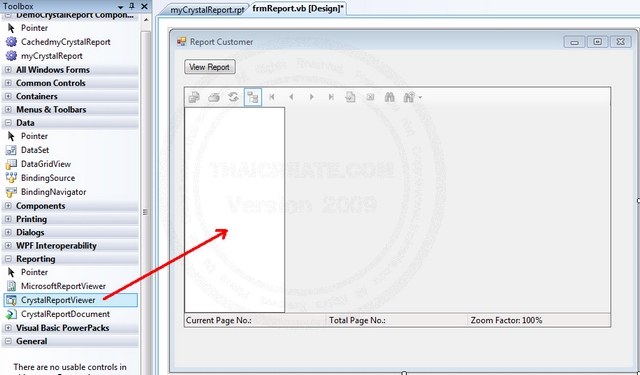
กลับมาที่หน้า Windows Form ให้สร้างปุ่มสำหรับโหลด Report และลาก Control ชื่อ CrystalReportViewer เพื่อใช้สำหรับรองรับการแสดงผลของ Report
จากนั้นให้ Click ที่ Button เพื่อสร้าง Event ในการโหลด Report โดยใส่คำสั่งดังนี้
Code VB.NET
01.Imports CrystalDecisions.CrystalReports.Engine02. 03.Public Class frmReport04. 05.Private Sub btnViewReport_Click(ByVal sender As System.Object, ByVal e AsSystem.EventArgs) Handles btnViewReport.Click06.Dim rpt As New ReportDocument()07.Dim directory As String = My.Application.Info.DirectoryPath08.'rpt.Load(directory & "\\myCrystalReport.rpt")09.rpt.Load("C:\DemoCrystalReport\DemoCrystalReport\myCrystalReport.rpt")10.Me.CrystalReportViewer1.ReportSource = rpt11.Me.CrystalReportViewer1.Refresh()12.End Sub13. 14.End ClassCode C#
01.using Microsoft.VisualBasic;02.using System;03.using System.Collections;04.using System.Collections.Generic;05.using System.Data;06.using System.Diagnostics;07.using CrystalDecisions.CrystalReports.Engine;08. 09.public class frmReport10.{11. 12.private void btnViewReport_Click(System.Object sender, System.EventArgs e)13.{14.ReportDocument rpt = new ReportDocument();15.string directory = My.Application.Info.DirectoryPath;16.//rpt.Load(directory & "\myCrystalReport.rpt")17.rpt.Load("C:\\DemoCrystalReport\\DemoCrystalReport\\myCrystalReport.rpt");18.this.CrystalReportViewer1.ReportSource = rpt;19.this.CrystalReportViewer1.Refresh();20.}21. 22.}หลังจากวาง Code เรียบร้อยแล้ว ลองกดที่ Run เพื่อดูผลลัพธ์ของ Report
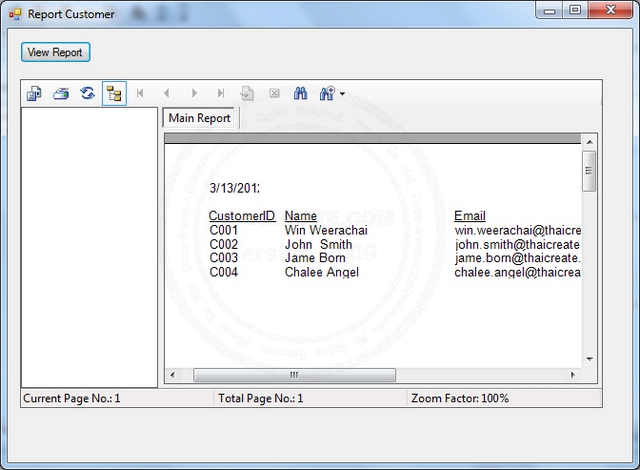
ทดสอบการรัน Report จะได้ผลเหมือนในรูป
บทความนี้เป็นพื้นฐานการใช้ Crystal Report กับ Visual Studio แบบง่าย ๆ สำหรับวิธีการใช้งานในรูปแบบอื่น ๆ เช่น การสร้าง DataSource ด้วย DataSet หรือ DataTable หรือการส่งค่า Parameters ต่าง ๆ จะมีตัวอย่างให้ศึกษาในบทความถัดไป
Download Code!!
ref : http://www.thaicreate.com/dotnet/crystal-report-vb-net-cs.html
No comments:
Post a Comment